

Contents
How to Effortlessly Create Terms and Condition Page for Your eCommerce Store
The term transparency plays a crucial part when it comes to operating a business. It gives your customers a clear idea about the services you offer. Likewise, in the case of the eCommerce business, it means a lot since there is very little chance for you and your customers to meet in person. As you know ‘trust’ is the key factor to make your customers engage more with your eCommerce store.
Having specific terms and condition page for your eCommerce store is essential to let your customers understand the services you offer to them. Most importantly, it keeps you free from any kind of lawsuit against your eCommerce venture.
However, this practical guide will demonstrate a step-by-step guide on how to create terms and conditions aka terms of use page for your eCommerce store. Let’s get deeper!
How to Create Terms and Condition Page for Your eCommerce Store
Crafting a terms and condition page for eCommerce isn’t that easy if you don’t pick up the right solution to make it happen. Here, in this guide, you’re getting a comprehensive way to master the steps using the quality plugin named Legal Pages.
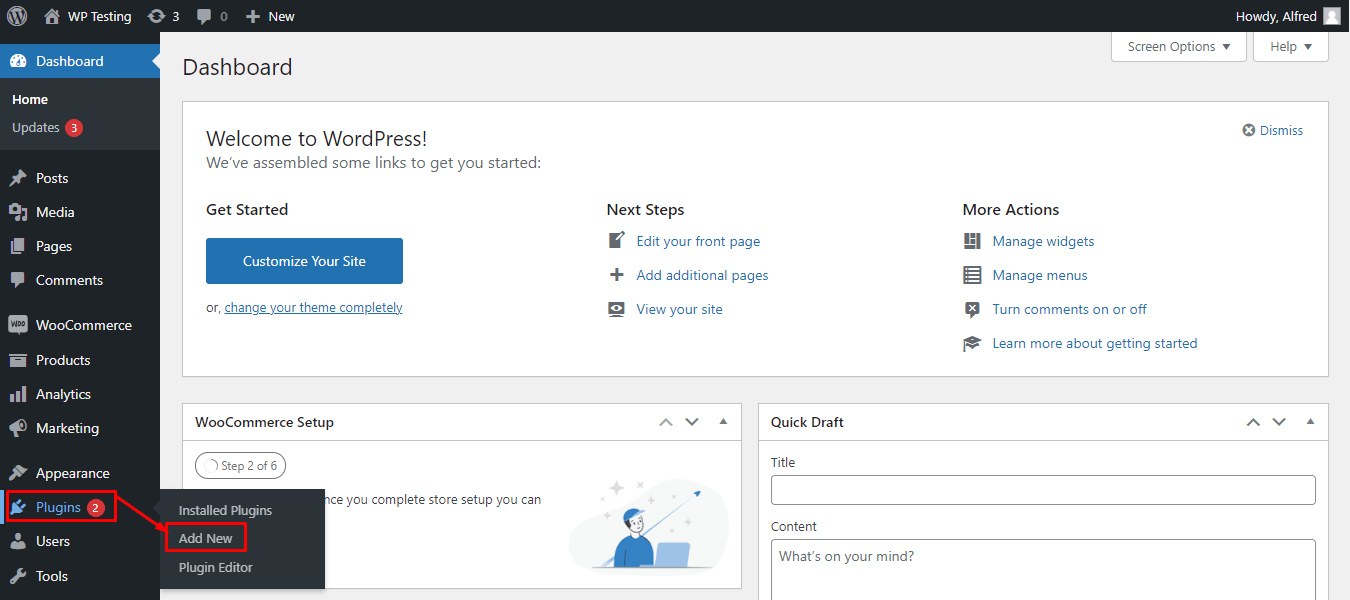
Step 1: Install and activate the plugin
To create a privacy policy page for your website, first, you need to install the plugin. To do this, go to your WordPress Dashboard Admin Menu and then click on Plugins➤ Add New
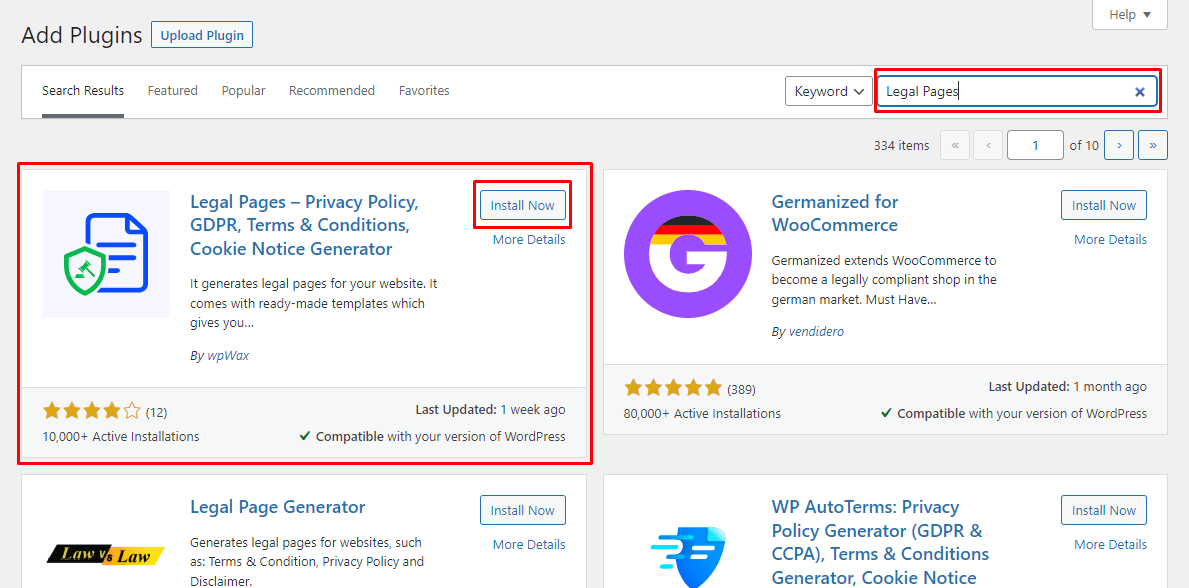
Now, you see, you are in the WordPress plugin repository. Write the name of the plugin ‘Legal Pages’ in the Search Box of the page. Once you hit the enter button, you will see the plugin Legal Pages in the search result. Next, click on Install Now to activate the plugin.
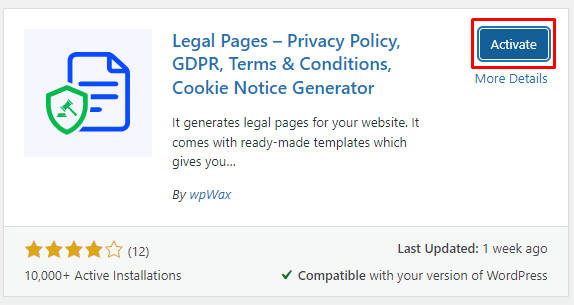
After installing the plugin, click on Activate to activate the plugin.
Step 2: Exploring the ‘Legal Pages’ plugin
See, you have successfully installed and activated the ‘Legal Pages’ on your WordPress site. Let’s explore this plugin to get a clear idea of creating your first terms and conditions page effortlessly.
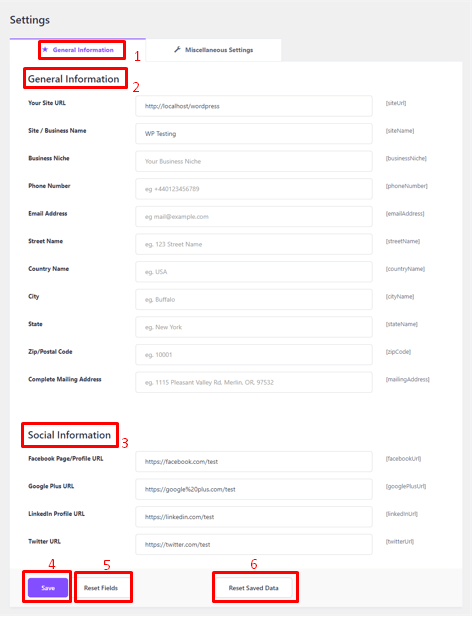
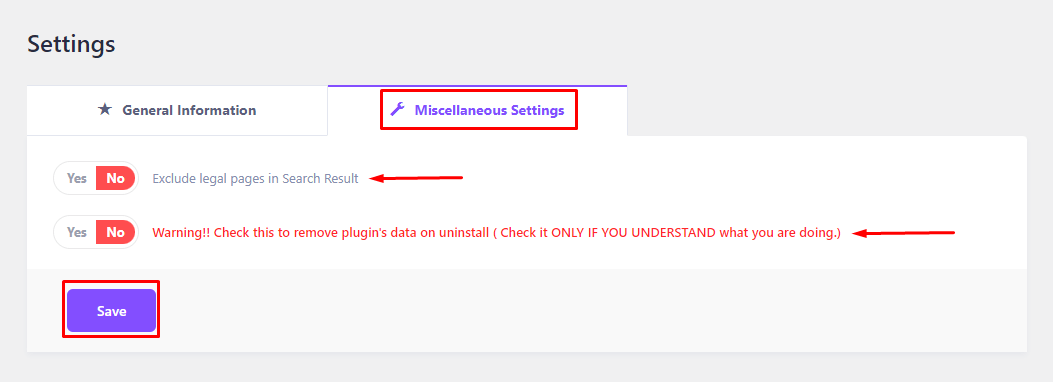
Now, click on Legal Pages from your WordPress admin dashboard located in the left sidebar. There, you will find the Settings option to start off the process. This option consists of two tabs named General Information and Miscellaneous Settings.

Step 3: Add various information in ‘General Information’
Now, you are working with the General Information tab. This tab is the combination of two different parts named General Information and Social Information.
In General Information, provide the basic information about you and your site in the specific fields. Remember, the information you provide in the ‘General Information’ option will be used when you use the ready-made templates to create your favorite types of legal pages.
Next, in the Social Information, you should provide the URL addresses of different social media you use for your eCommerce site. Finally, after providing all the required information, click on the Save button to record your given data. You can Reset Fields and Reset Saved Data as well from here.
Lastly, in Miscellaneous, you get two options. In the first option, you can check the box whether you want to exclude legal pages in the search result. The second option allows you to remove the plugin’s data on deactivation if you check this box. After doing everything, don’t forget to click on the Save button to save all the changes.
Step 4: Add new ‘ Terms and Conditions’ page
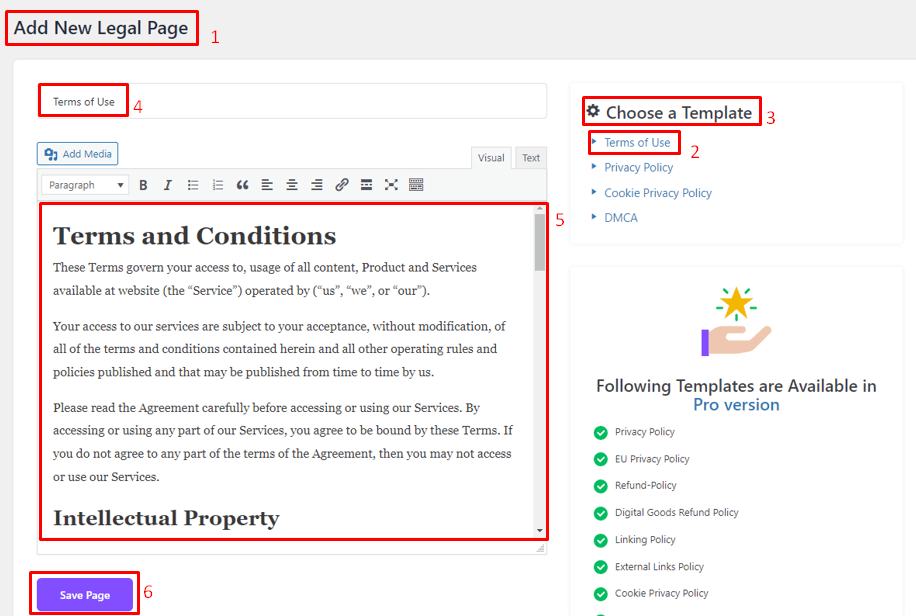
Next, you can work with the Add New Legal Page tab. To add a new terms and condition template, go to Settings ➤ Add New Legal Page. Then, select a template named Terms of Use from Choose a Template on the right side of the page.
One thing to note, when you select the Terms of Use template the Title and Paragraph part of the new page will automatically be fulfilled with the new ‘terms and conditions’ template’s text. Now, click on Save Page to save all the changes you have made.
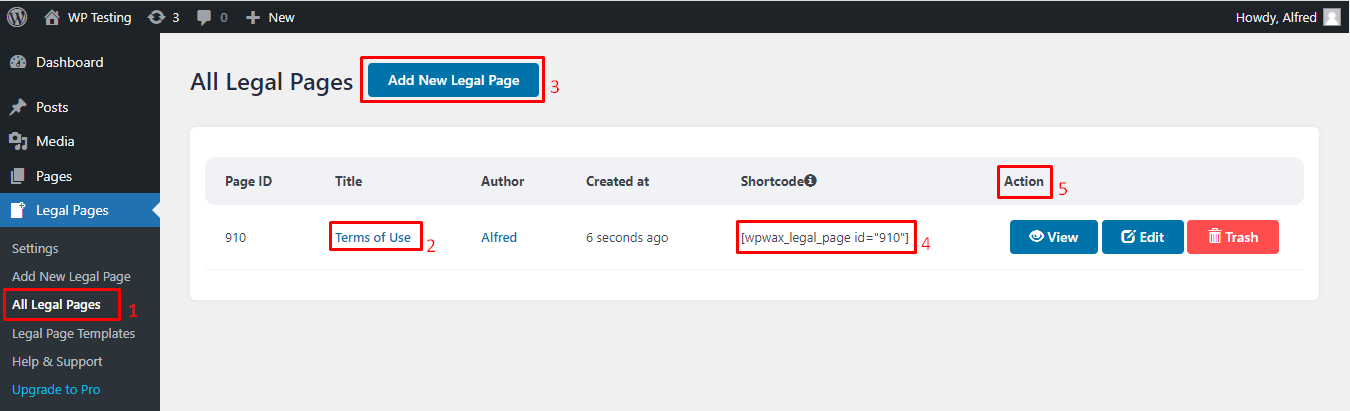
The next is the All Legal Pages tab. Your recently created Terms and Conditions page named Terms of Use has been stored here. There is an option to include a new legal page by clicking on Add New Legal Page.
In Shortcode, you can copy the shortcode and paste it to any page or post you want and display the newly created terms and conditions page. The Action option helps you view, edit or trash the terms and conditions page if you want.
And finally, you have successfully created a terms and condition page for your eCommerce store.
Grab More Features with ‘Legal Pages Pro’
Do you want to grab more features and functionalities to flourish legal pages using experience for your eCommerce websites? We recommend using Legal Pages Pro. This sophisticated plugin provides unique features to give you a more advanced experience. Let’s have a look at them.
1. 15 more unique shortcodes to use on the templates: This plugin offers 15 more unique shortcodes to design your templates. These shortcodes highlight your personal and website-related information to customize your templates.
2. Generate unlimited pop-ups: Use your content to generate unlimited pop-ups. Use the shortcodes to display the newly generated popups.
3. 22 more stunning templates: You can get 22 more stunning templates with ‘Legal Pages Pro’. So, it becomes easier to create more legal pages.
4. Cookie banner customization: You can customize the cookie banner and make it more stunning with options like display/hide the EU cookie alert for users, display the cookie bar anywhere on your page, adjust the color for different settings, and more.
So, use this plugin and explore more features of it.
Wrapping Up
Your business success is in your hands. More transparency about service to customers can lead your business one step further. That’s why a clear and easily understandable terms and condition page is an effective way to achieve your customers’ trust.
In this article, I have shown you a complete guideline for creating terms and conditions pages for your eCommerce store. If you have any queries regarding this guideline, don’t hesitate to let us know your valuable queries in the comments section below.
If you liked this post, don’t forget to subscribe to our blog so that we can notify you once any post is published. Finally, you can also follow wpWax on Facebook, Twitter, and LinkedIn for more exciting news, offers, and product updates.

Abdullah Al - Harun
Abdullah Al Harun is a technical content writer at wpWax and a digital marketing enthusiast. Apart from tech, he enjoys reading books on different aspects of communication, journalism, science, and arts. On his time off, you will find him playing cricket with his teammates.


Leave a Reply
You must be logged in to post a comment.