

How to Display Logos Using Ajax Load More Pagination in Grid: A Detailed Guide
Building trust in users’ mindsets isn’t an easy task if you want to boost your website’s conversion. There are numerous ways through which you can achieve it. But not all of them are effective enough to serve this purpose. Among the fewest solutions, displaying logos of your reliable clients, stakeholders and customers can create a good impression about your website on visitors’ mindsets.
To present logos in a dynamic and alluring way to visitors, you can use the Ajax load more button. This functionality creates an urge among them to explore more logos with a simple click on a button. Moreover, Ajax load pagination is a smart choice if you display logos in an eye-catching approach to visitors.
In the upcoming article, we will show you a step-by-step process of how you can display logos in grid view with Ajax load more pagination. We will use a sophisticated WordPress plugin to do this with minimal effort. Let’s start the show!
Stepwise Process of Displaying Logos in Grid Using Ajax Load More Pagination
This guideline will lead you to a step-by-step process of displaying logos in Grid view using the Ajax pagination button. Before going deep, it’s necessary to install WordPress as the dedicated Content Management System (CMS).
To complete the process smoothly, you will use a dynamic plugin named ‘Logo Showcase Ultimate Pro‘. So why wait!
Step 1: Upload and activate ‘Logo Showcase Ultimate Pro’
First, upload the ‘Logo Showcase Ultimate Pro’ on your website. To do that, go to your WordPress dashboard Admin Menu Bar and click on Plugins➤Add New. It will take you to the Add Plugins page. Next, click on Upload Plugin to upload ‘Logo Showcase Ultimate Pro’.

Next, click on Choose File to select the .zip format file of ‘Logo Showcase Ultimate Pro’. Once you have selected the file, click on Install Now.

After installing ‘Logo Showcase Ultimate Pro’, click on Activate Plugin to make it active on your website.

So, you have successfully installed the plugin on your website.

Step 2: Add a new logo
Let’s explore how you can add a new logo to your site. To do that, get back to your Admin Dashboard and click on Logo Showcase➤Add New logo. It will redirect you to the Add New Logo page.
Next, to add a logo on your site, give a Preferable name for it by clicking on Add title. After that, add your preferred logo by clicking on Set logo. Once you have set the logo, click on the Publish button on the right side of the page to save the changes you have made. You can add as many logos as you want following this way.
You can find all the created logos by clicking on Logo Showcase➤All Logos. This action will take you to the Logos page.

Step 3: Generate new shortcode for logo
This step will guide you on how to generate new shortcodes for logos so that you can display logos with minimal effort. To do this, click on Logo Showcase➤Shortcode Generator➤Generate New Shortcode.

Now, you are on the ‘Generate New Shortcode’ page. First, give a title to this page in the Add title box. This page contains shortcodes and three different settings options: General Settings, Grid Settings, and Style Settings.
However, each of these Settings includes multiple functionalities to make the logo showcasing experience more eye-catching for the visitors.

Let’s tour all of these Settings options to know their functionalities.
Shortcodes
In ‘Shortcodes’, you can use the automatically generated shortcode to display logos. Just copy the shortcode and paste it to any post or page you like, and your logos will be displayed automatically.

General Settings
Within ‘General Settings’, you will find some basic functionalities like grid layout to display logos, the option to set the number of total logos to be displayed, customize header title, and more to offer users an amazing logo showing experience.

Grid Settings
‘Grid settings’ option helps you display logos in grid view. You can select the theme based on your choice, optimize columns to display logos smartly on different devices, select pagination type, etc.

Style Settings
If needed, you can set the image hover effect within’ Style Settings’. Besides, from here, it’s easy to adjust the tooltip by customizing the tooltip position, text color, background color, and font size.

Step 4: Copy and paste the shortcode
Once you have done the necessary customization in different Settings, copy and paste the Shortcode to display logos on any post or page of your website. Before that, don’t forget to click on the Publish button.

To display logos in a grid view with the Ajax Pagination button, go to the ‘General Settings’ and select the number of logos you want to display in Display Total Logos.
Remember, to display logos using Ajax load load pagination button, the number of logos to be displayed should be less than the number of the total logos you have created.
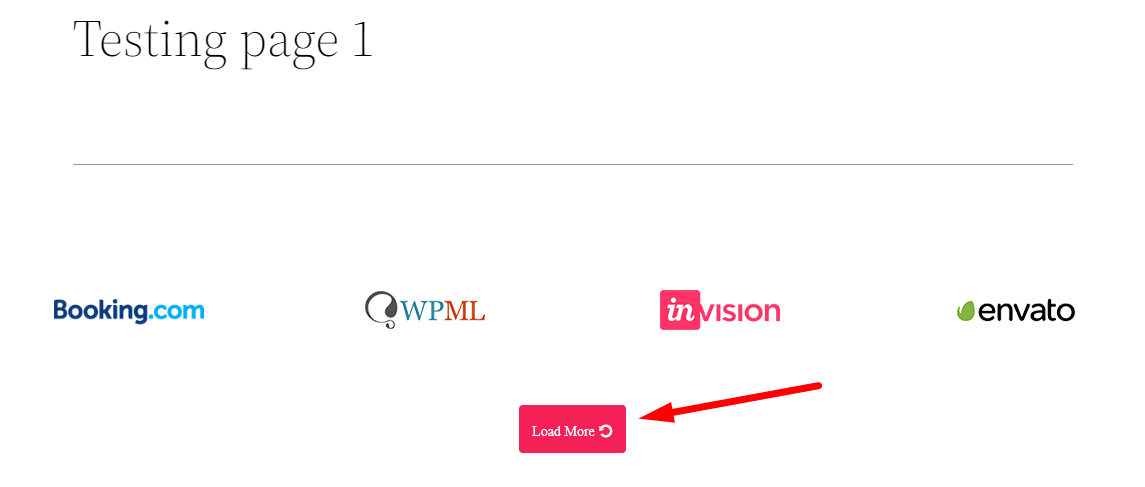
For better understanding, on your website, the number of total logos is six but when you set the number of logos to be displayed in grid view using Ajax pagination, it is 4. Otherwise, the Ajax load button won’t be functional at all.

Next, go to the Grid Settings and click on the YES button in Pagination. Then, scroll down and click on Ajax Load More Button in the Pagination Type option. After that, click on the Update button to save all the changes.

You will be redirected to the Shortcodes option. Now click on Update and copy the Shortcode to your preferred post or page.

Finally, you have successfully displayed as many logos you like using the Ajax Load More Button.
Polishing Off
The more effective ways you have to convince your customers, the possibilities to boost your business will increase simultaneously. With that in mind, this article has demonstrated an efficient way to achieve the trust of your potential consumers by displaying logos in grid view using Ajax load more pagination. We think following this article can play a crucial part in making the logo showcasing experience more dynamic.
Furthermore, this guide will significantly save your valuable time to showcase logos. If you find this article helpful, feel free to share your experience with us We are passionately waiting to get your feedback in this regard.
If you liked this post, don’t forget to subscribe to our blog so that we can notify you once any post is published. Finally, you can also follow wpWax on Facebook, Twitter, and LinkedIn for more exciting news, offers, and product updates.

Abdullah Al - Harun
Abdullah Al Harun is a technical content writer at wpWax and a digital marketing enthusiast. Apart from tech, he enjoys reading books on different aspects of communication, journalism, science, and arts. On his time off, you will find him playing cricket with his teammates.


Leave a Reply
You must be logged in to post a comment.