

How to Block Cookies Using WordPress: A Practical Guide
Did you know how to block cookies in WordPress?
Cookies are one of the most popular ways for tracking users online. They are small text files stored on your computer by the websites you visit. Cookies track your browsing history and improve your user experience by storing your preferences.
Despite their benefits, Cookies can be used to track your online activity without consent. This act can violate your privacy and compromise your security.
Fortunately, there are different ways to block cookies. Among them, using a WordPress plugin is a vibrant way to execute this functionality. This functional guide will demonstrate how to block cookies using WordPress.
How to Block Cookie ( A Step by step Guide)
In this practical guide, we will learn how to block cookies using WordPress in detail. To complete this process effortlessly, upload and activate a plugin ‘Legal Pages Pro‘ on your website.
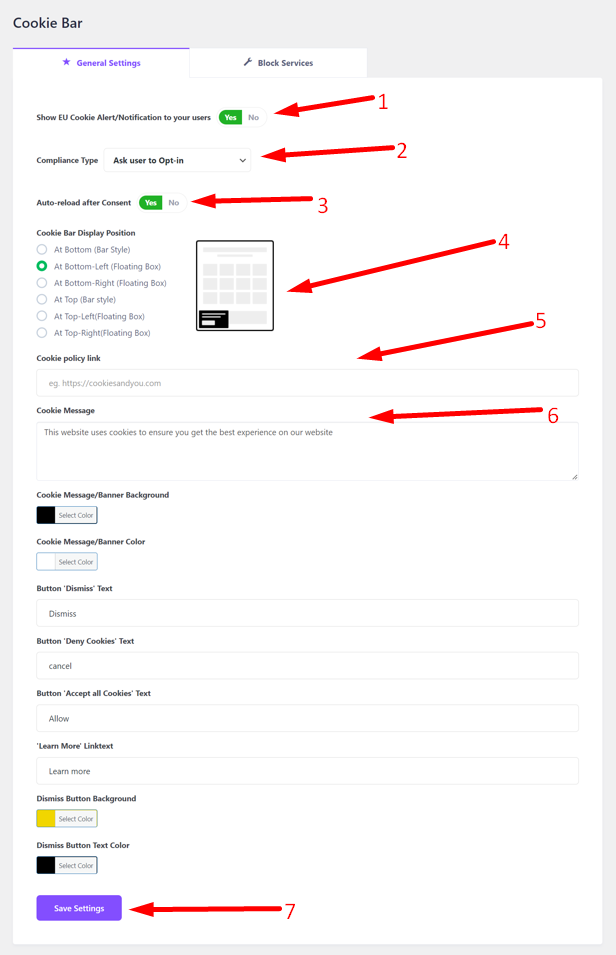
First, you need to customize the Cookie Bar’s General Settings. To do this, go to Legal Pages ➤ Cookie Bar. You will directly land on the ‘General Settings’ tab.

Once you have successfully landed on the ‘General Settings’ tab, it offers different options to customize the Cookie Banner display. Let’s discuss the options one by one.
Show EU Cookie Alert/Notification to your users: Enabling this option lets you display the EU Cookie Alert/Notification on your website.
Compliance Type: You will get 3 different compliance types here. Display the cookie message only, Ask user to Opt-in and Ask user to Opt-out. All these three have distinct functionalities.
Clicking on ‘Display the cookie message only’ will display the cookie message when you display any service on your website.
By clicking the compliance type ‘Ask user to Opt-in’, a cookie banner will appear that needs the user’s consent before displaying that particular service. If the user clicks on ‘Allow’, that particular service won’t be visible, and clicking on ‘Deny’ means that the service won’t be visible.
Next, selecting the ‘Ask User to Opt-out’ means a cookie bar will appear along with a service, and the cookie needs the user’s consent to display the service or not.

By enabling the Auto reload after consent, it will automatically load a service page if you block it or not.
Next, you can set the Cookie Bar Display Position where you want to display cookies. There are six different positions available to show the cookie bar. You can set Cookie Policy LInk and Cookie Message as well. There are also other options to make the cookie bar easily understandable to users. Lastly, after making all the changes, click on Save Settings.
Step 2: Explore the ‘Block Services’ option
Once you have made the necessary customization for the cookie bar, it’s time to work with the Block Services option. You will get all the required functionalities to block cookies for one or more services.
The first option name is Enable Service Blocking; this option is enabled by default. Read the texts below the option to understand clearly how Service Blocking works.
Up next, there are three options: Rules, Available Services and Guideline. Each of these includes some different options as well. Within Rules, two more options are available: Services and Allowed with consent. The ‘Services’ displays the list of services that are already blocked. You can add more services to the blocked service list by clicking ADD A RULE.

In the Available Services section, you will get the list of Services along with Identifier Regex. These services have been listed by default. After making all the changes, click on Save Settings.

Step 3: Add new service to the list
No worries if you don’t find the required service you want to block on the list. You can add the service by clicking on ADD SERVICE. A popup named ‘Add a new service’ will appear. Now, add your service with Identifier Regex and click on Save to list the new service on the list.

Next is the Guideline. This section is helpful if you aren’t clear about the service-blocking process. The Modus Operandi easily explains the service-blocking process.
In the later part, you will get the detailed process of service blocking on How to Block a Service. Besides, there is a guideline for including new services in the How to add a new service. Lastly, click on Save Settings to save all the changes you made.

This is how you can effortlessly block cookies using WordPress.
Tying Up
Cookies are used for a variety of purposes, but mainly they are just used to track how people are moving through your website. If you trust your site but don’t trust website cookies, it’s time to start blocking cookies.
With that in mind, in today’s practical guide, we have demonstrated the process of how to block cookies using WordPress in some simple steps. We hope this article will immensely help you to master the technique of blocking cookies service.
If you liked this post, don’t forget to subscribe to our blog so that we can notify you once any post is published. Finally, you can also follow wpWax on Facebook, Twitter, and LinkedIn for more exciting news, offers, and product updates.

Abdullah Al - Harun
Abdullah Al Harun is a technical content writer at wpWax and a digital marketing enthusiast. Apart from tech, he enjoys reading books on different aspects of communication, journalism, science, and arts. On his time off, you will find him playing cricket with his teammates.


Leave a Reply
You must be logged in to post a comment.