

How to Create an Email for a Business at No Cost
Are you looking for ways to create business emails address without having to pay anything? If the answer is ‘Yes’, you have found the right place.
There are several reasons why you might want to get a business email address. For example, you may want to start a new job and don’t want to spend time registering at each company. Or maybe you want to build a brand identity for your business. Whatever the reason, there are different trusted providers from which you can quickly get an email account for your business.
To grease the wheels, in this practical guide we will be demonstrating how to create an email for a business entirely free of cost. Let’s scroll down to the details!
Things to Consider Before Creating a Business Email Address
Some factors you need to consider before creating business email. Let’s have a look at them.
1. Effortless setup process

The first aspect of an email provider is whether the steps to set up your domain with them are simple and uncomplicated. While keeping the process simple, ensure that your service provider does not want you to skip the necessary authentication steps.
Choose a business email provider that offers an easy setup process. Make sure that all the necessary steps for setup are elaborately described to make the setup process easy for you.
2. Seamless migration system

Your selected business email provider should be efficient enough to migrate all your contacts, emails, and data from the former provider. It’s crucial because it would be devastating if data is lost due to a faulty migration process.
3. No compromise to data security and privacy

A potential business email provider is always strict in ensuring proper security and privacy of data. All Your shared personal information should be private and secure using multiple authentication layers so that none will dare to break the security.
4. Relevant domain name

Select an email which domain sounds relevant to your business. That’s why to choose an email name that permits your favorite domain name and allows you to use it if available.
5. Powerful control panel

Pick a business email service provider with a powerful control panel that enables you to perform multiple tasks like user management, group addresses, domain settings, spam policy, and more.
Stepwise Guide on How to Create an Email for a Business
To create business emails address for free, some specific business email service providers are available. Among them, we have selected Zoho Mail as it’s a robust tool for creating a business email address for your business.
Step 1: Start working with Zoho Mail
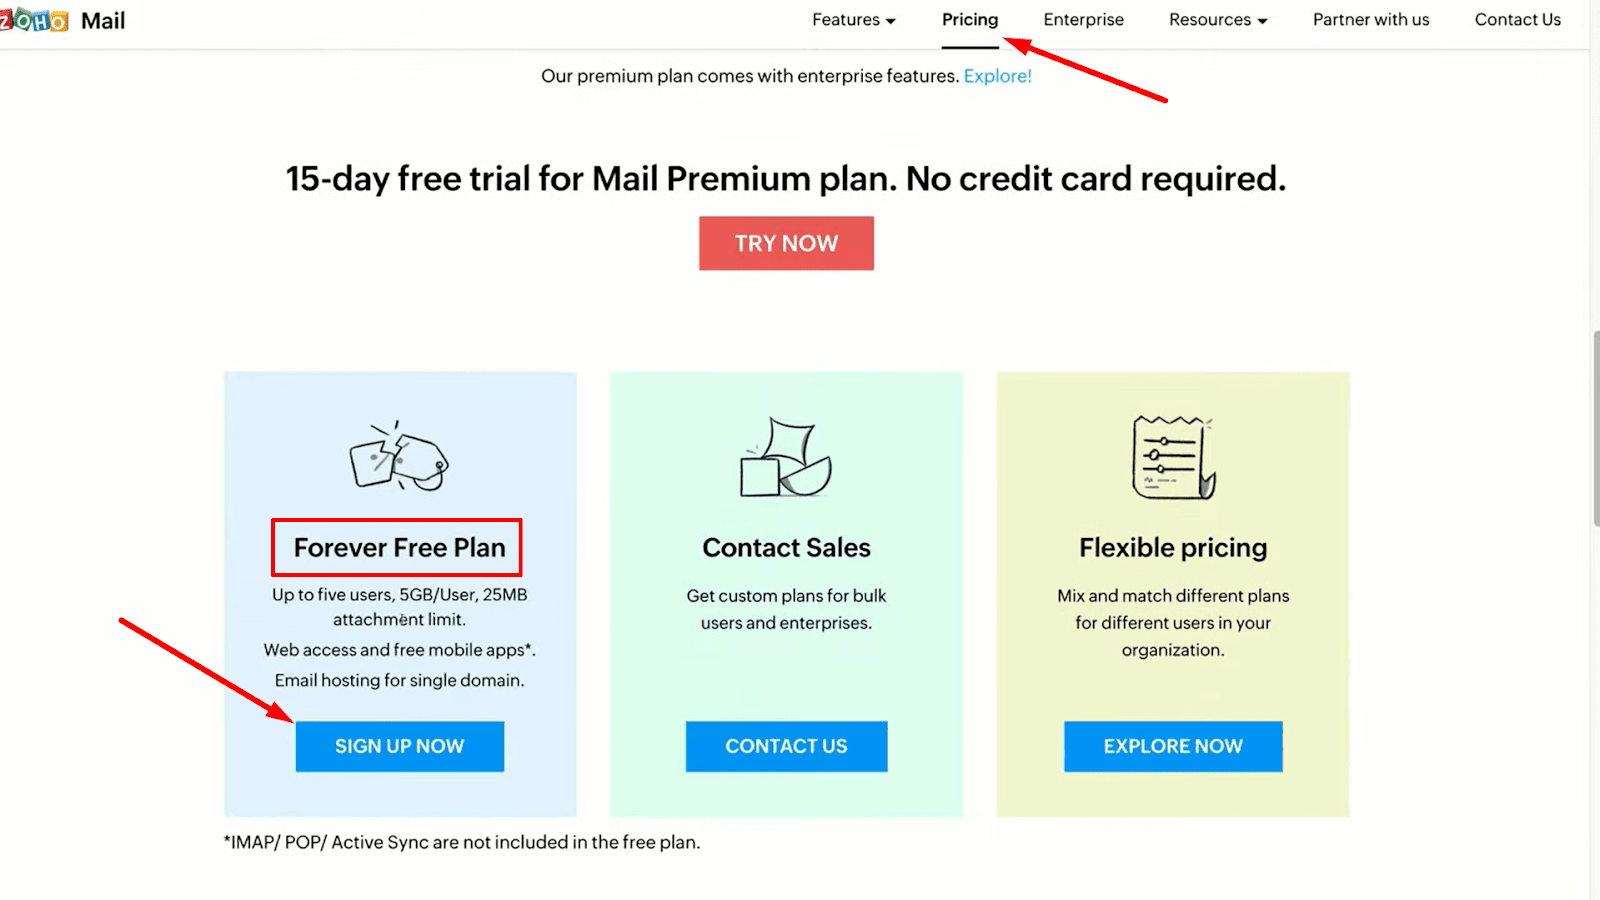
Let’s start by heading over to the official website of Zoho Mail. Now, go to the pricing option and continue scrolling until you find the Free plan. This plan offers five business emails entirely free of cost. Besides, the plan also has some other stunning features.
Considering Zoho Mail’s facilities, it’s evident that it can be a perfect business email solution for small businesses. You may have noticed that you need a professional domain name as well. Next, click on Sign Up Now under the Forever Free Plan.
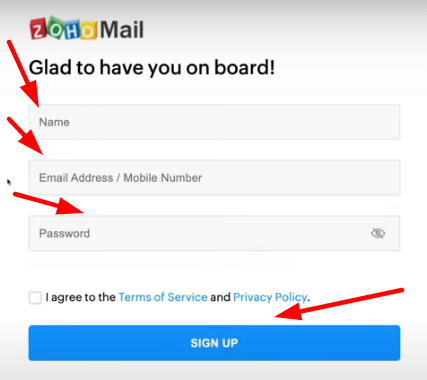
Now, enter some personal information about Name, Email Address or Mobile Number, and Password. Now click on Sign UP.
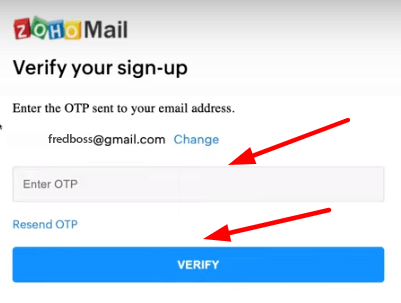
You will get a verification OTP on your Email address or phone number that you have used to sign up. Now, proceed and paste that OTP code and click Verify. You have successfully signed in to the Zoho Mail!
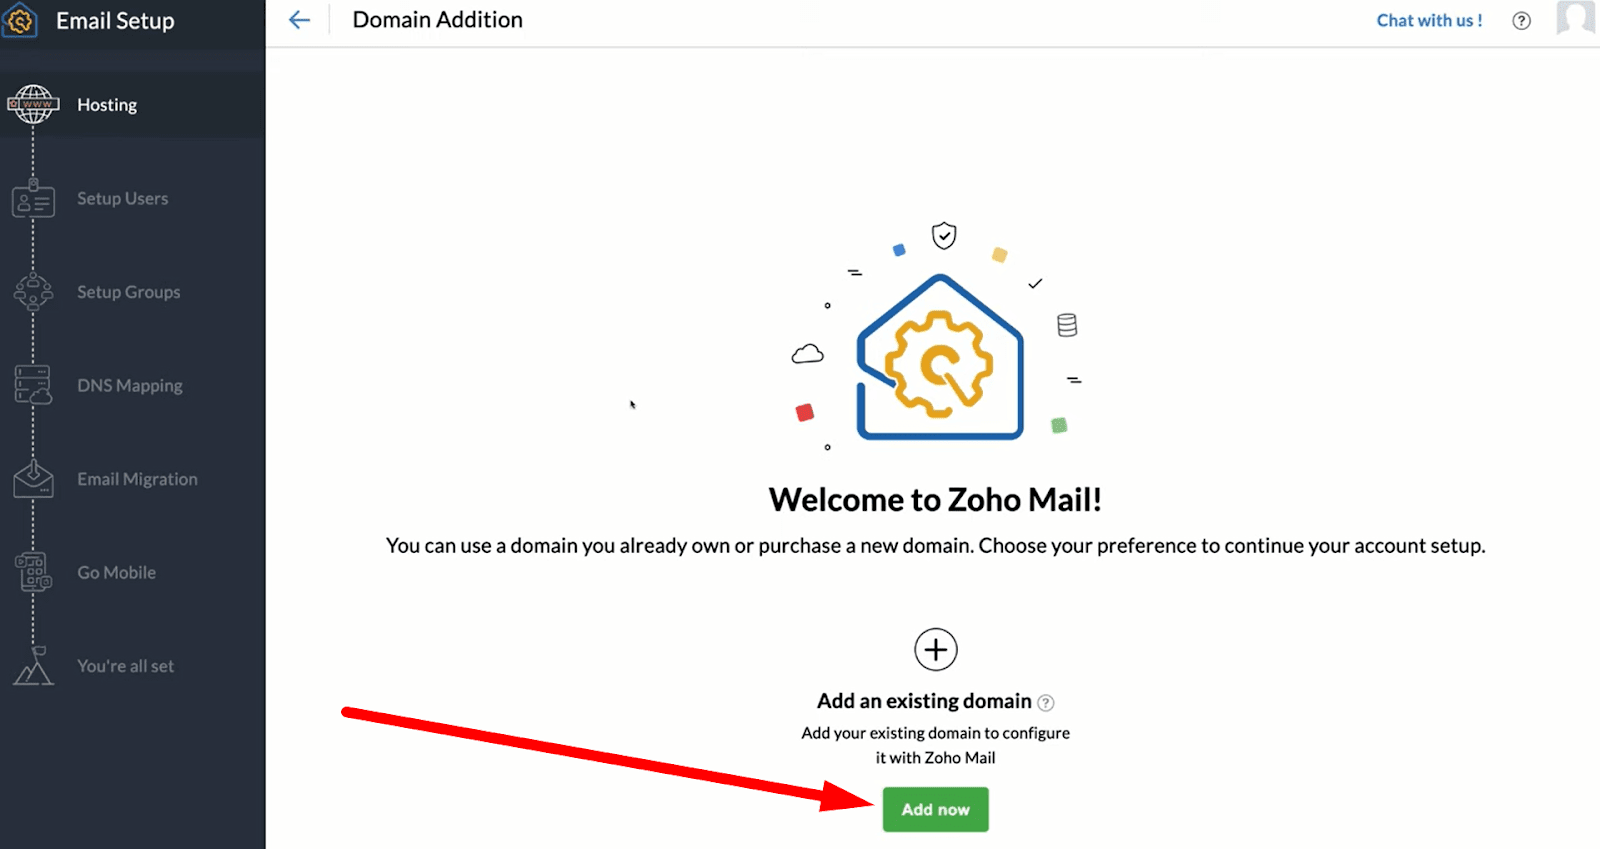
Step 2: Complete your Zoho Mail account setup
Now, this step is for adding an existing domain. To do this, click Add Now to add your domain name and organization name.
After adding the ‘domain name’ and your ‘organization’s name’, click Add.

Click on Proceed to domain verification. Now, copy the TXT Value and go to the Domain provider.
Next, select Domains shown on the left side and click My Domains. It’s time to find out your domain name and click My Domains. After finding the domain name, click DNS Settings and Edit Zone Records. Now, from the New Record, choose TXT from the drop-down menu.
Now, Add @ symbol in the Host. Paste the code that you have copied recently on Content and click Add. Next, go to your Zoho Mail account and click Verify TXT ReCord.
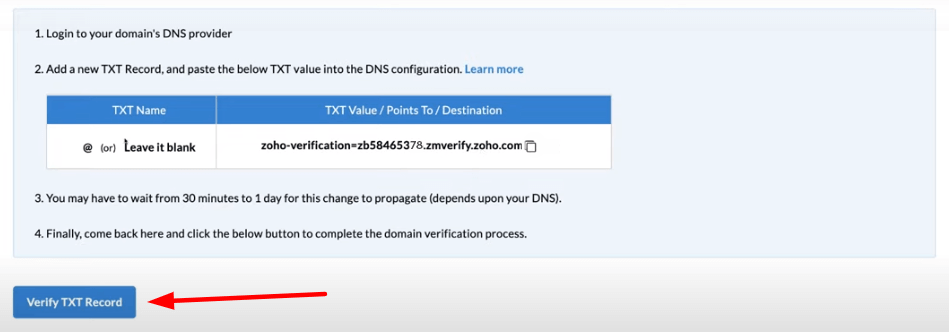
So, you have verified your domain ownership. Now, click on Create.
Step 3: Add users to Zoho Mail
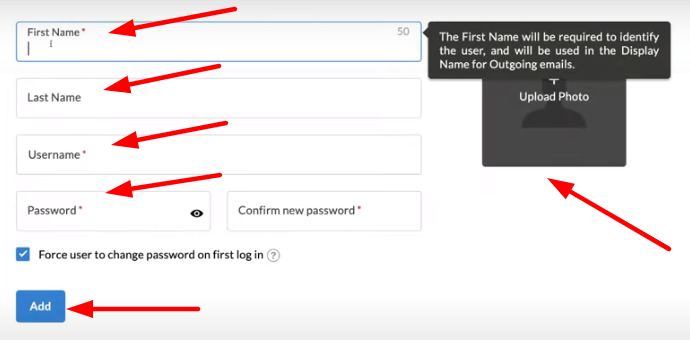
To add more than one user to Zoho Mail, click on Add. Enter the user’s first name, last name, username, and password. Besides, you can upload the profile picture. You will be notified if you want to force users to change their password for the first login. Select that particular option and click Add.
Step 4: Generate Email groups
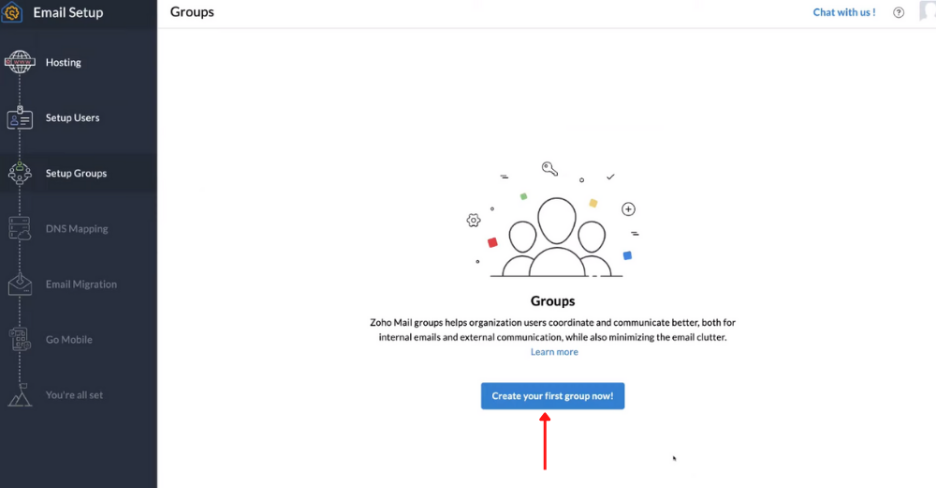
After successfully adding new users to Zoho Mail, click on Proceed to Setup Groups. You may specify emails to specific groups. For this, click on Create Your First Group Now.
Now, add a Group Name, Group Email Address, and Group Description. Now, specify who can Send emails to this group. Add a ‘profile picture’ for the group and click Proceed.
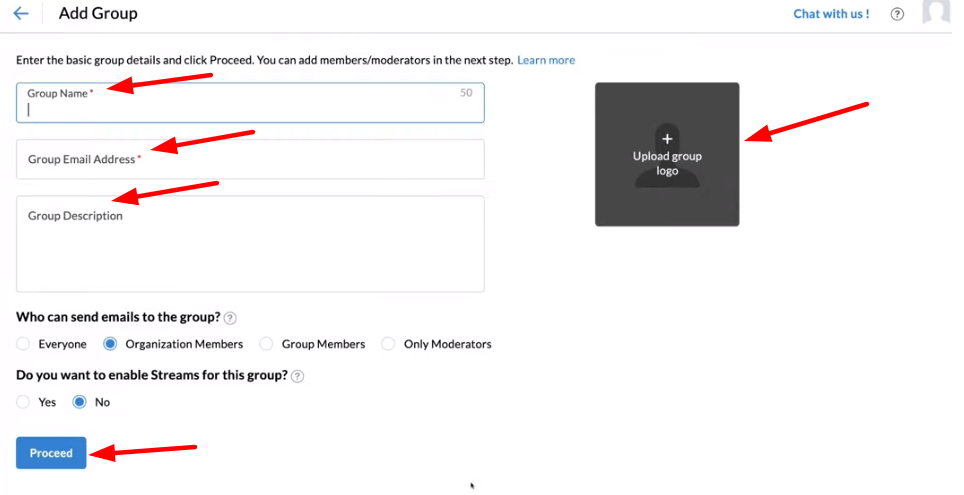
To add members to this group by clicking Add. From the drop-down menu, select Add all organization users and click Create Group. Your new email group has been generated successfully.

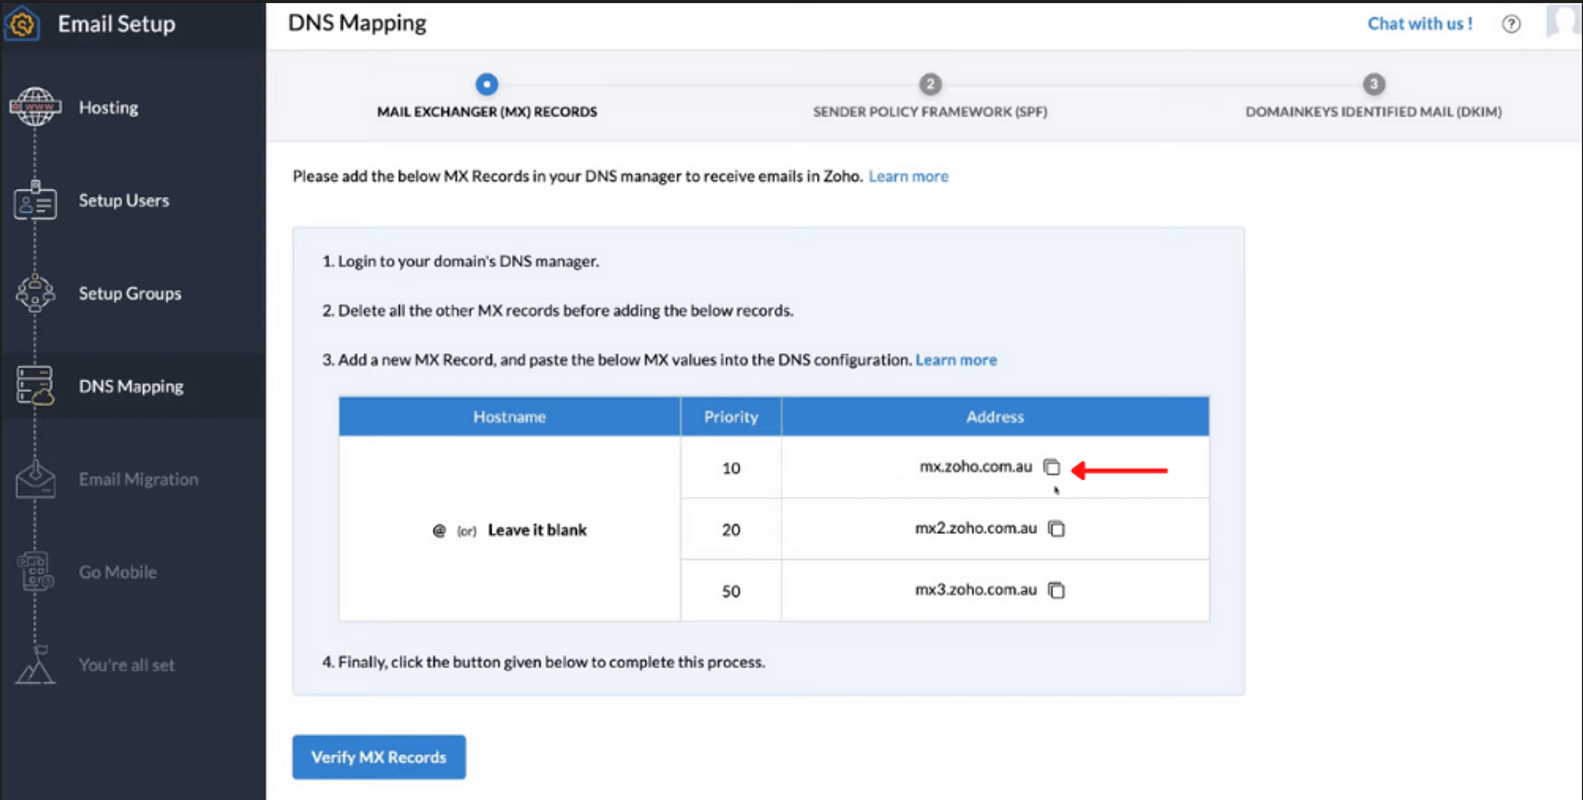
Step 5: DNS mapping verification
After creating your email groups, click Proceed to DNS Mapping. It’s time to go back to the domain provider and update the DNS records. Copy both priority 10 and the address next to it.
Below, Domain Info, find out New Record. Now, enter @ symbol in the Host field. Choose MX from the drop-down.
Next, paste the address and type 10 in the ‘Priority’ field. Now, click on Add. You can follow the procedure to add the other MX records. Once you are okay, click on Verify MX Records. It may take 24 hours to verify. In case any problem occurs, you may contact your domain provider for this issue.
Step 6: SPF record configuration
Now, you need to configure the SPF. For this, copy the TXT Value. Go back to your domain provider and paste the @ under New Record. Choose TXT from the drop-down menu and paste the address in Content. Up next, click Add. Go back to Zoho and click Verify SPF Record.

Step 7: DKIM record update
Copy the code under TXT Name and go back to your domain provider. Paste the value you have recently copied for Host. Now select TXT from the drop-down.
Next, copy the TXT Value from the Zoho Mail account. Paste this value in the domain provider’s Content field. Click on Add.
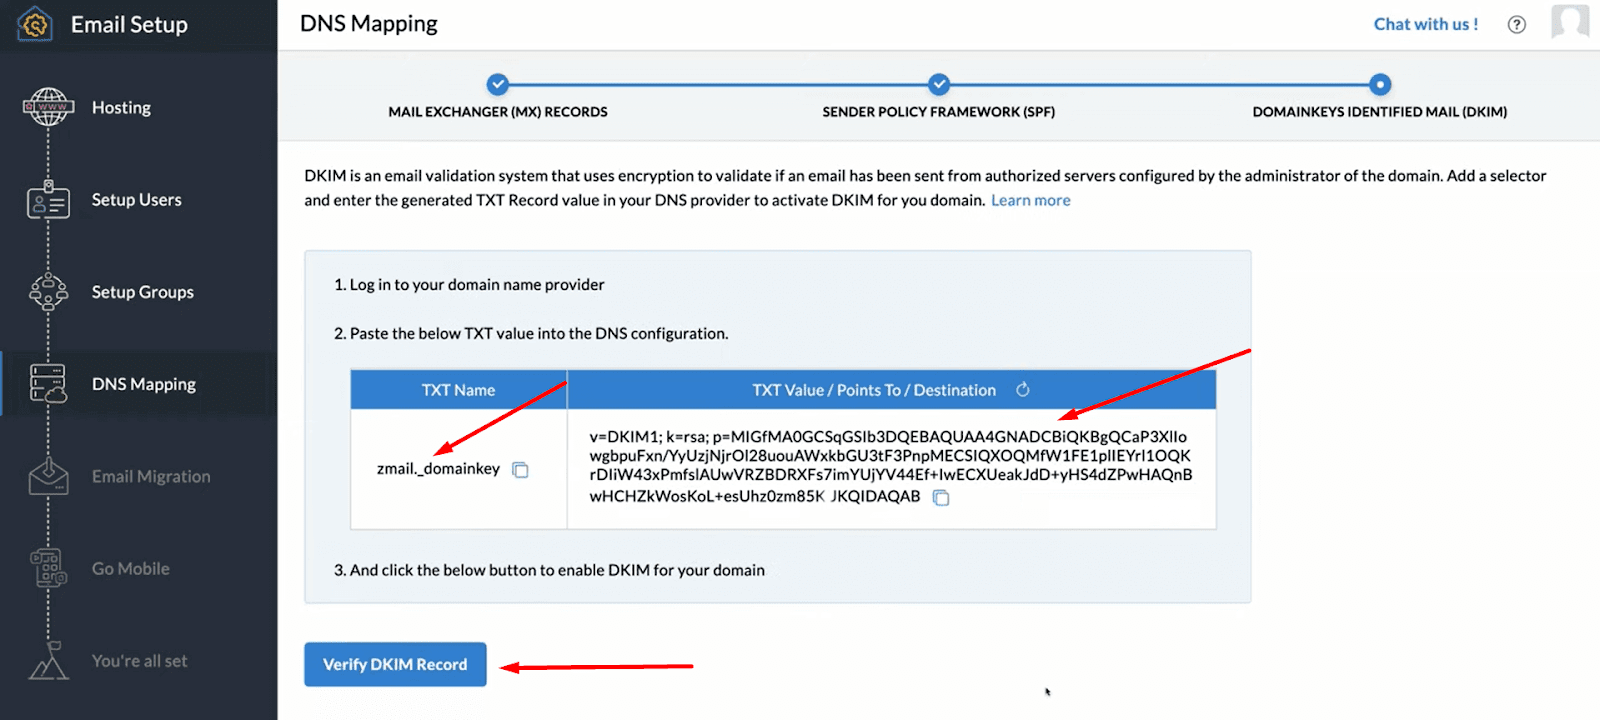
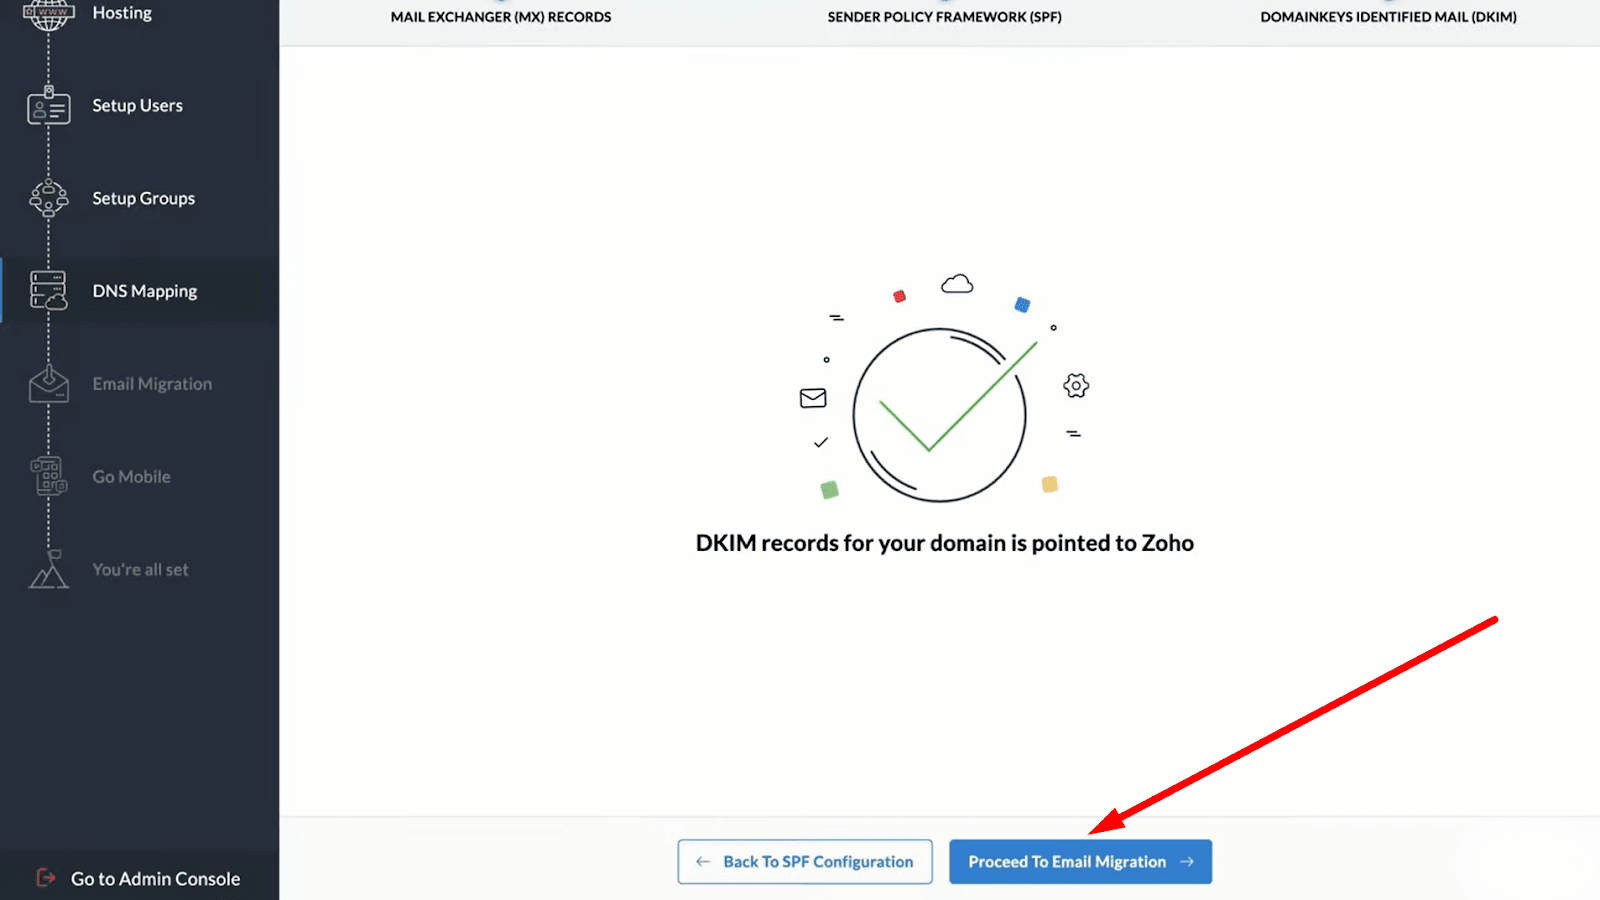
Now, go back to your Zoho Mail account and click Proceed to Email Migration.
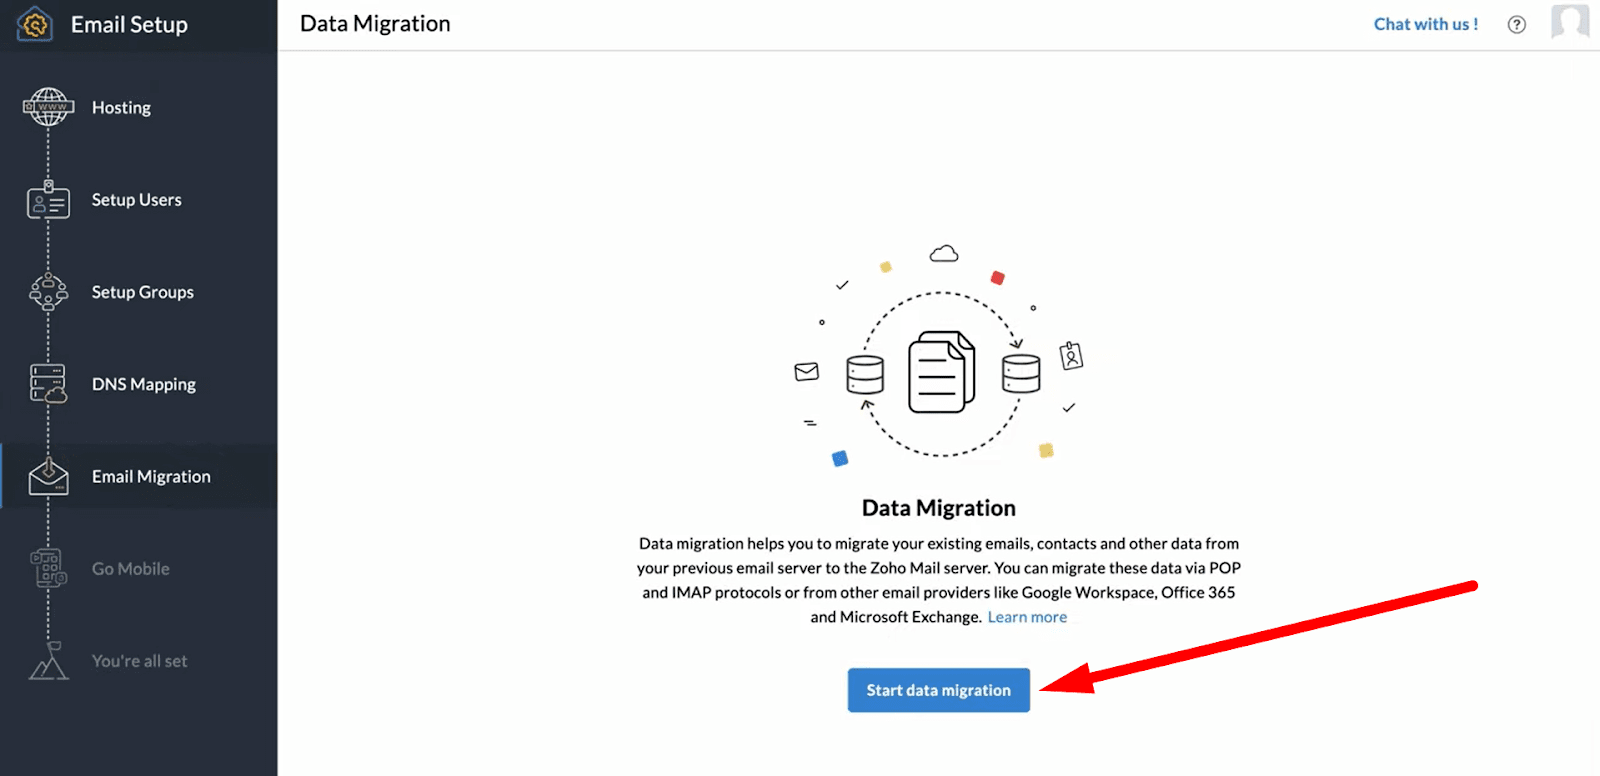
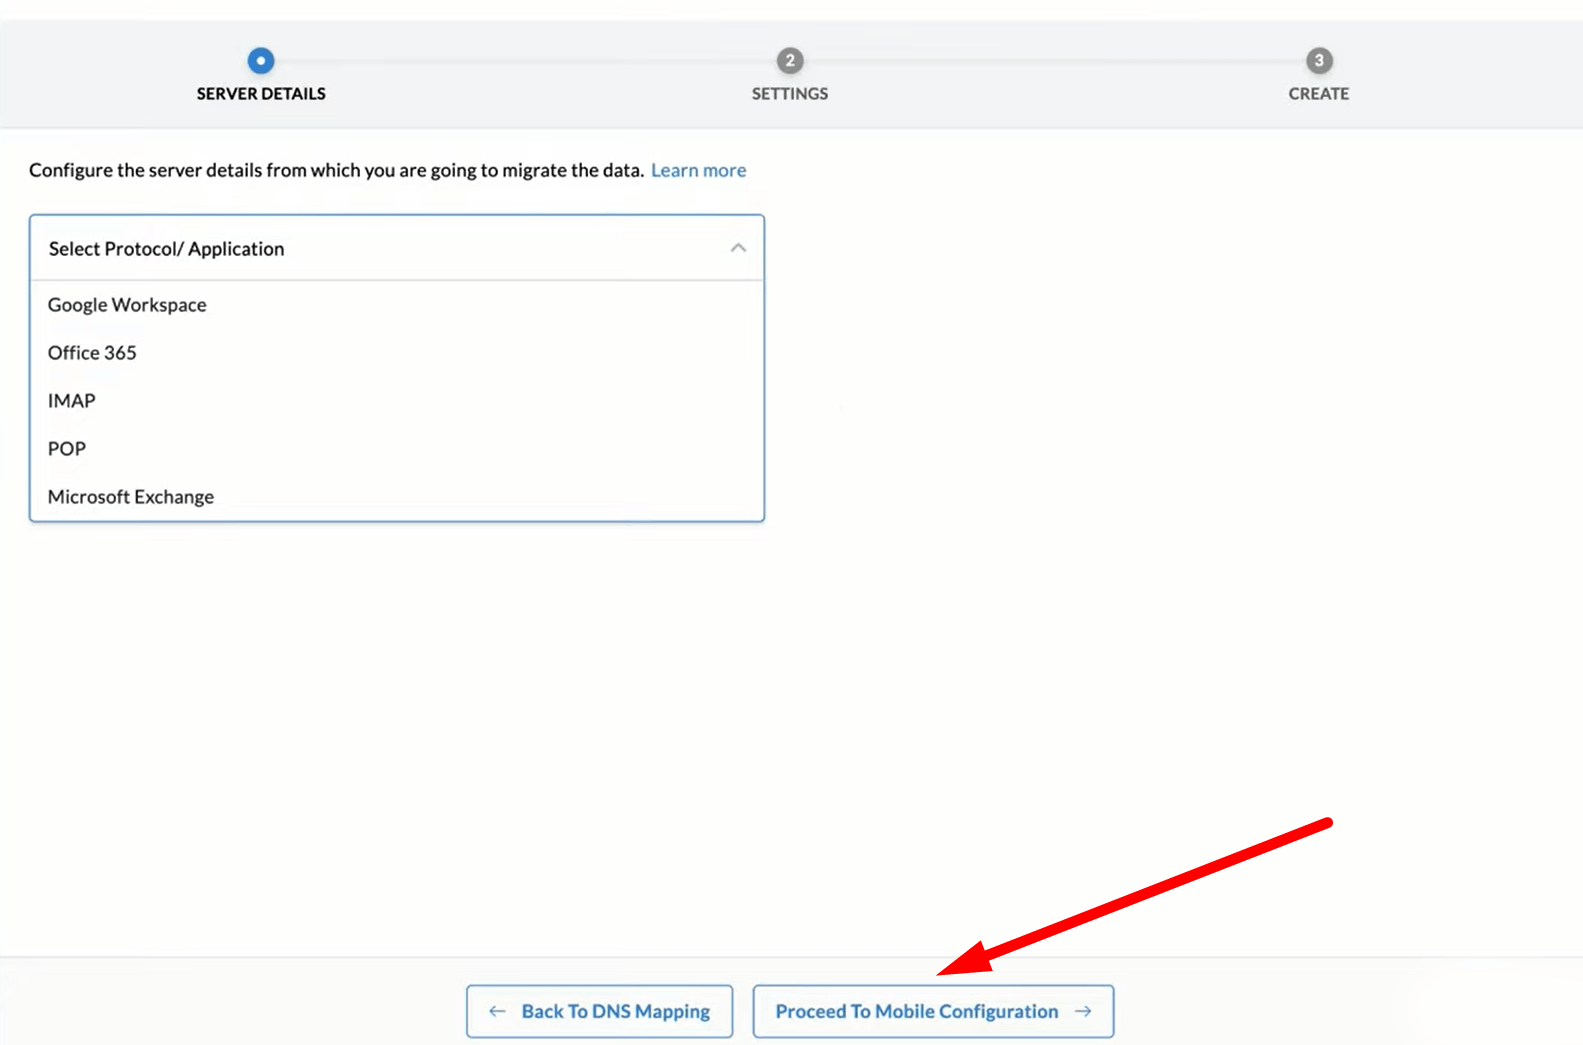
Here, you can migrate data from your previous email services by choosing Start Data Migration.
Next, click on Proceed to Moblie Configuration.
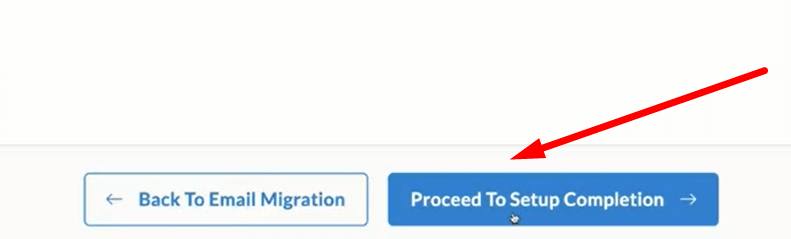
A text will appear saying that you can download Zoho mobile app to manage your business.

Now, go down to the screen footer and click on Proceed to Setup Completion.
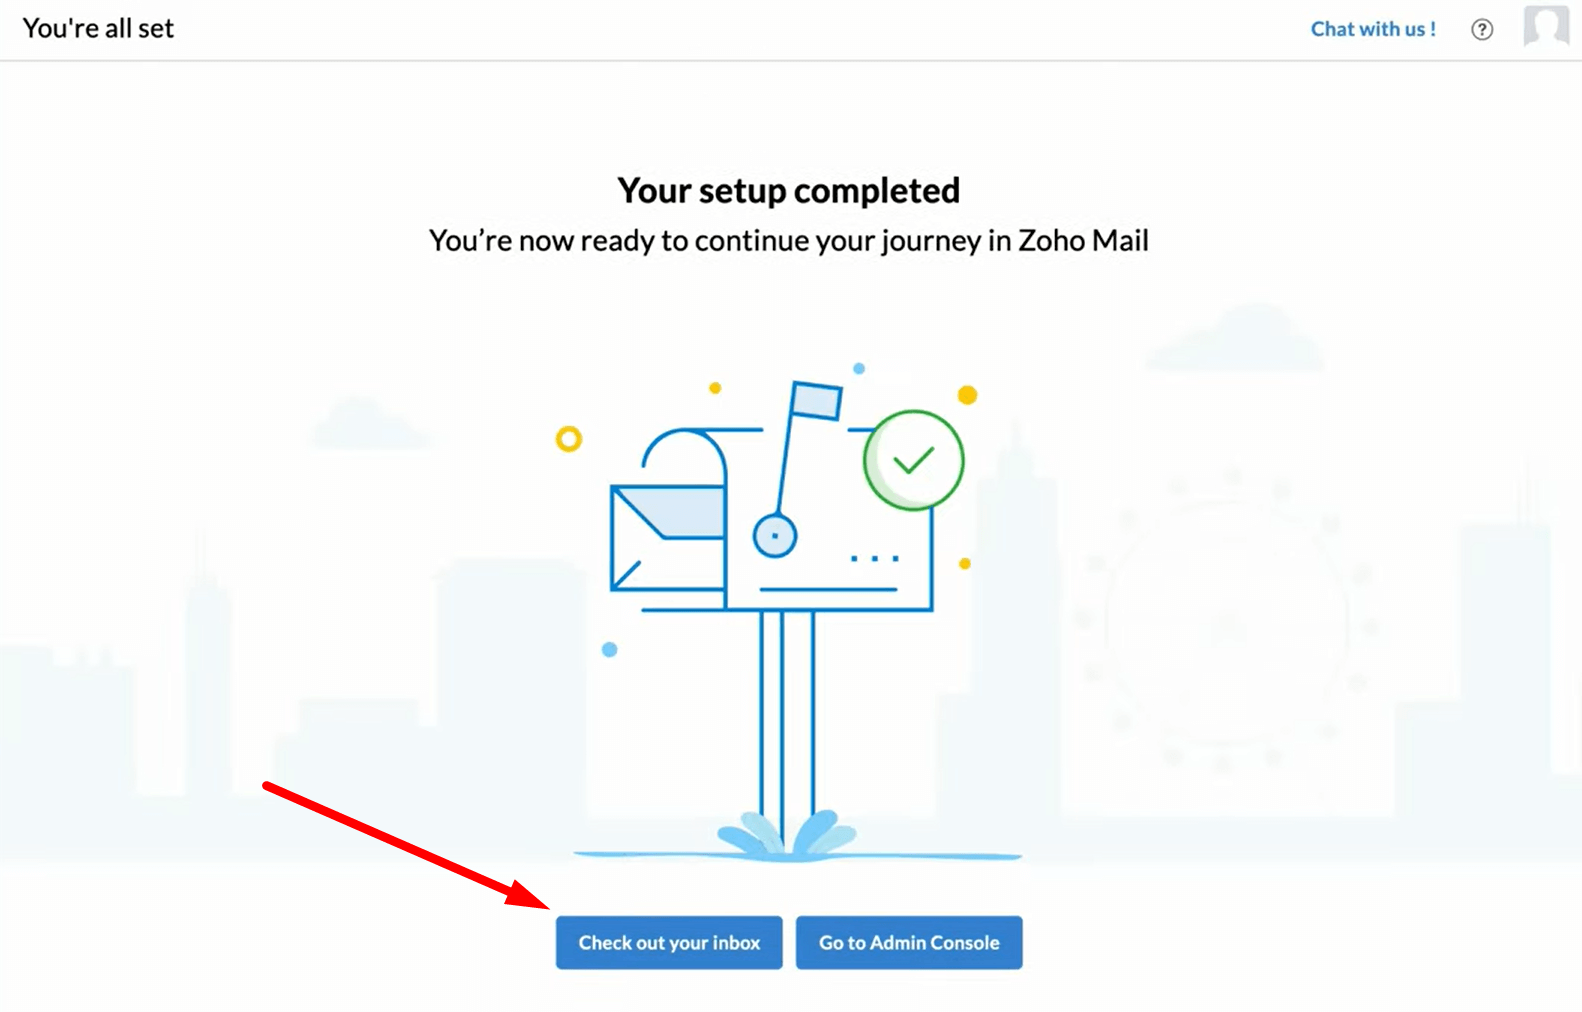
Finally, you will see the message of the setup completion. You are now ready to start your journey will Zoho Mail. To be sure, you can confirm it by clicking Check out your inbox.
This is how you can set up your Zoho Mail account. Following the steps we have demonstrated above, you can create free business emails for your small business. Now, it’s onto you to enjoy the fantastic features of Zoho.
Polishing Off
Having a professional business email address helps make your website stand out from the crowd regarding business and communication. Thereon, understanding the importance of email addresses for businesses, we have shown you an easy way how to create an email for business entirely for free.
So, from now on, it won’t be complex at all to create an unlimited number of business email addresses depending on your needs. If you have any queries regarding today’s topic, feel free to raise your voice in the comments section.
If you liked this post, don’t forget to subscribe to our blog so that we can notify you once any post is published. Finally, you can also follow wpWax on Facebook, Twitter, and LinkedIn for more exciting news, offers, and product updates.

Abdullah Al - Harun
Abdullah Al Harun is a technical content writer at wpWax and a digital marketing enthusiast. Apart from tech, he enjoys reading books on different aspects of communication, journalism, science, and arts. On his time off, you will find him playing cricket with his teammates.


Leave a Reply
You must be logged in to post a comment.