

How to Use Google Analytics in WordPress: A Practical Guide
If you’re running a WordPress website, you must know how to use Google Analytics. It’s crucial because Analytics can help you track your site traffic, understand your audience, and make better decisions about your content and marketing strategies.
Installing Google Analytics on your WordPress website is easy, and there are a few different ways to do it. Once you have Analytics installed, you can start tracking your site traffic and collecting data about your visitors.
And if you’re unsure what to do with all that data, don’t worry. We’ve got you covered. In this article, we’ll give you a step-by-step guide to using Google Analytics in WordPress and show you some ways to use your data to improve your site.
How to Use Google Analytics in WordPress Website
Getting started with Google Analytics in WordPress is easy if you know how to do it. We will walk you through the process step-by-step in the following.
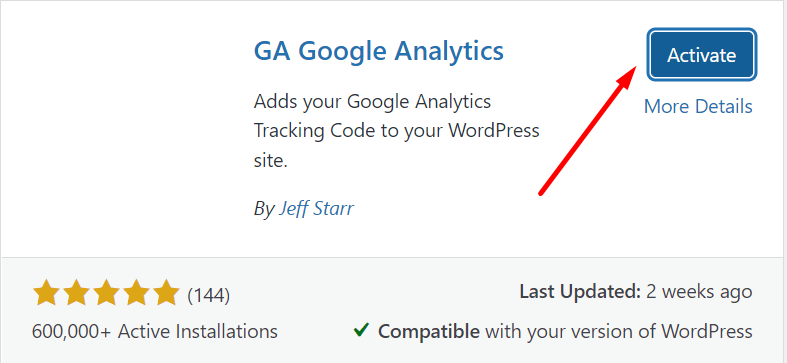
Step 1: Install and activate ‘GA Google Analytics’
To use Google Analytics in WordPress, install a plugin named ‘GA Google Analytics’ on your website.

After completing the plugin installation process, activate it on your website.
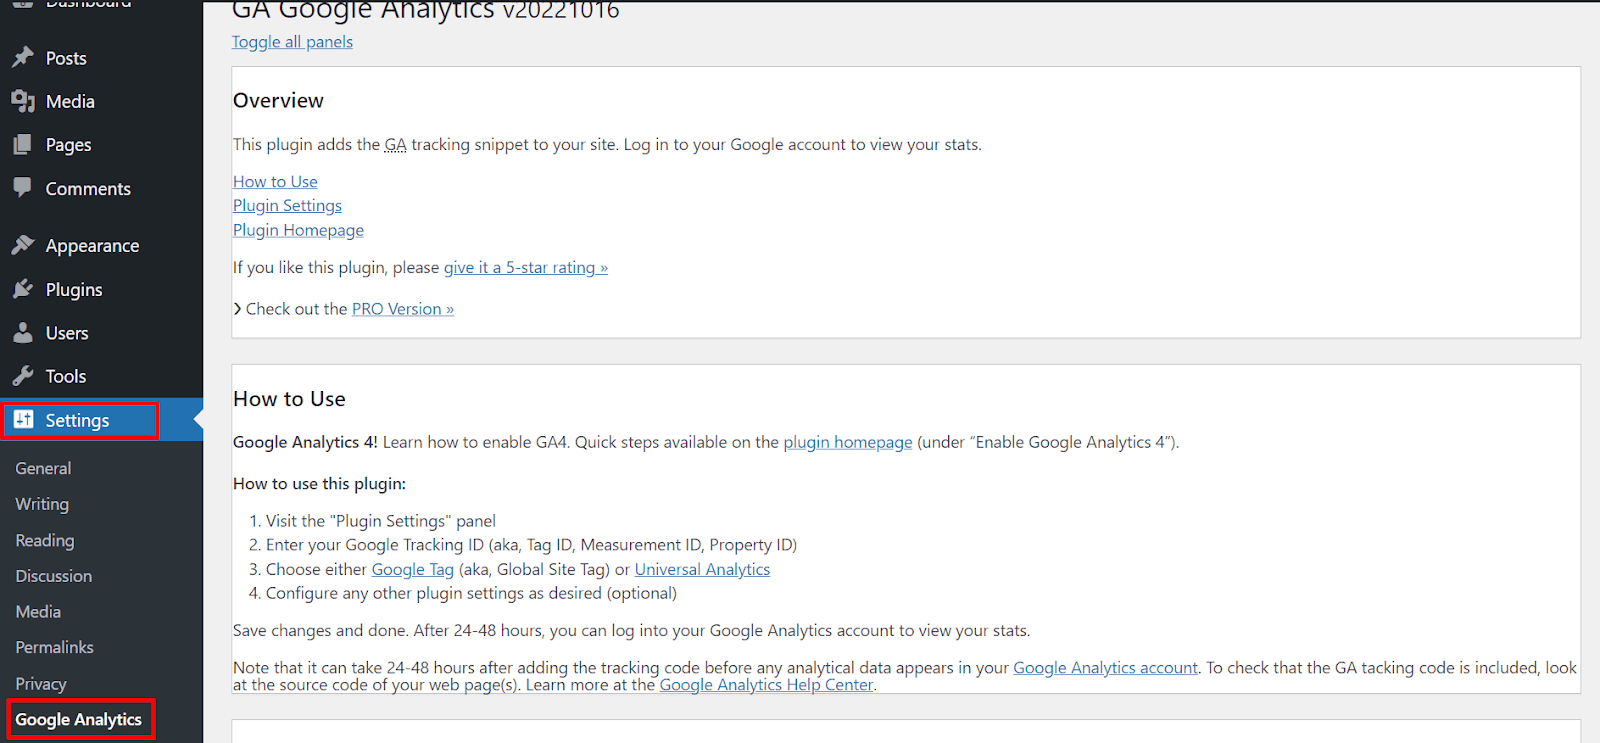
Step 2: Customize different settings in Google Analytics
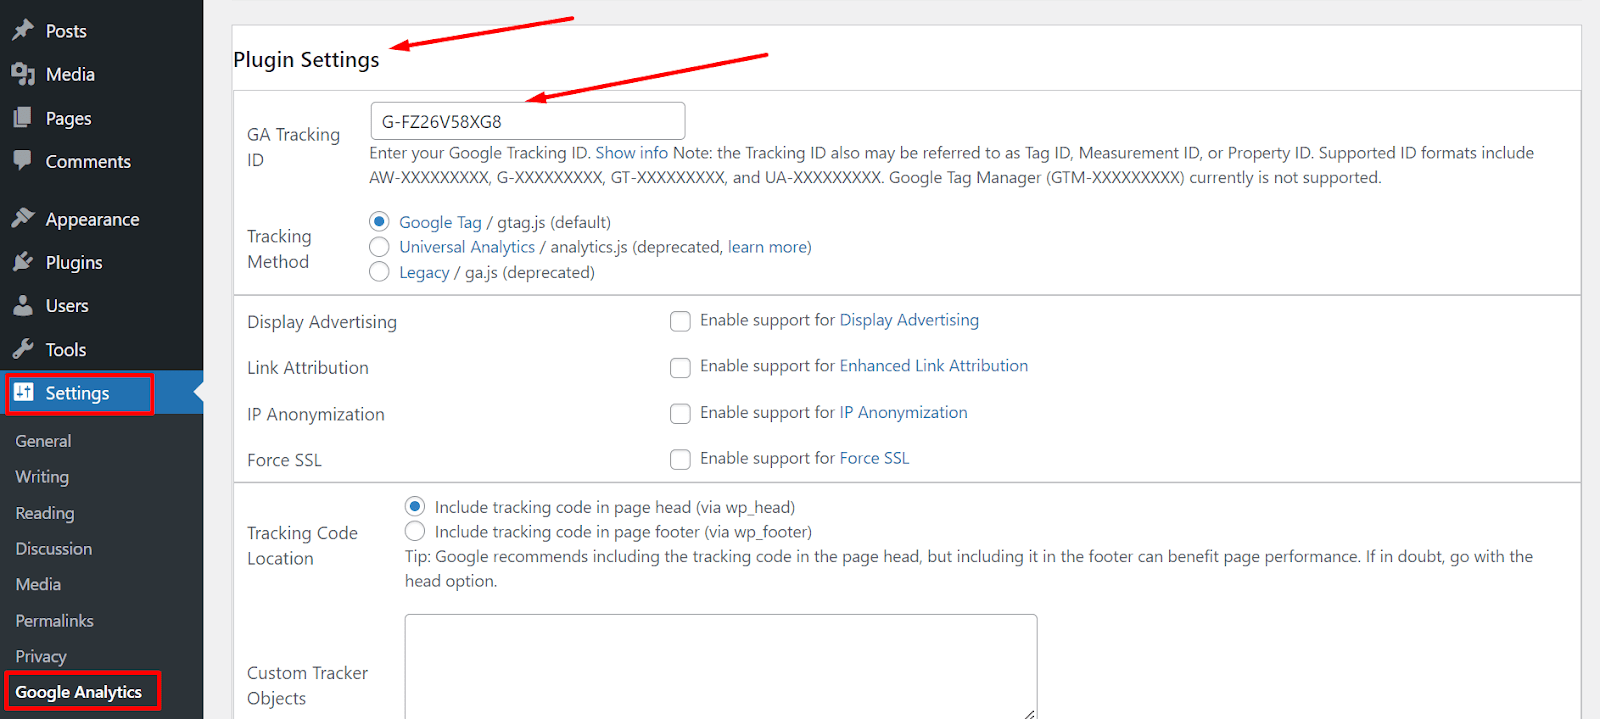
Once you have activated the plugin on your website, return to the Dashboard’s Admin Menu Bar and click on Settings ➤ Google Analytics.
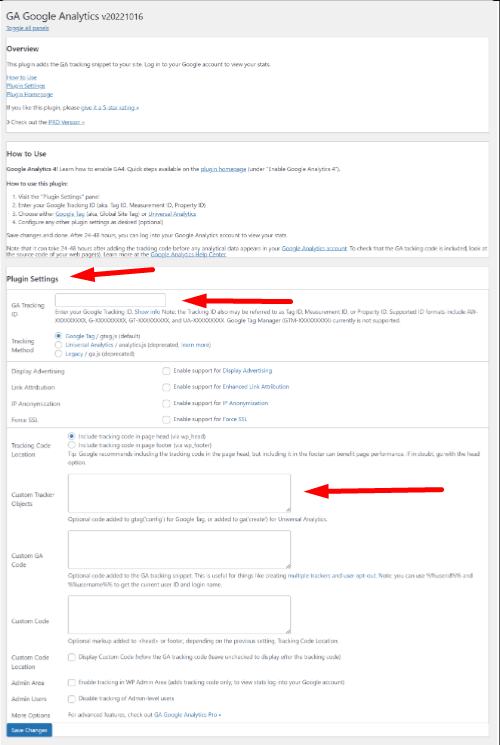
Now, move toward the Plugin Settings. Here you need to provide a GA Tracking ID. We will give this ID later. In the Customer Tracker Object, we will give the Google Tag. But we will provide all this stuff later.
Step 3: Explore the Google Analytics page
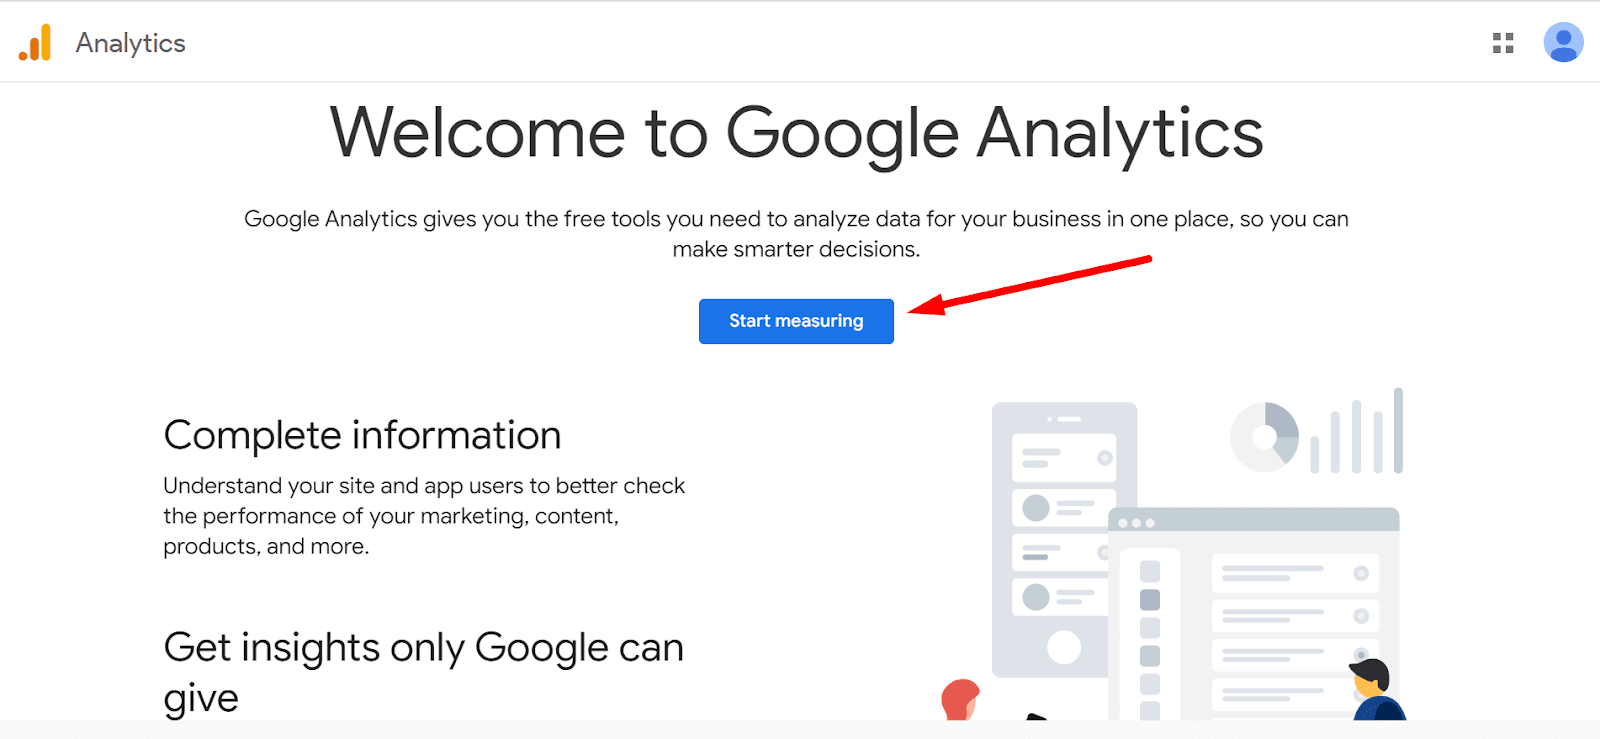
Next, you need to open up a new browser and type analytics.google.com. This action will take you to the ‘Google Analytics’ page. Now navigate over to Start Measuring.
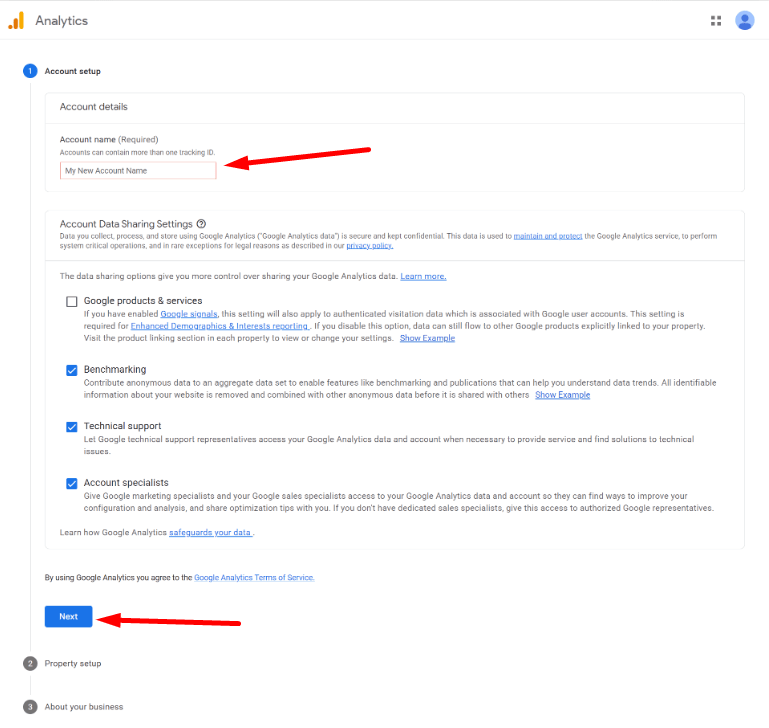
Now, you need your business name in the Account name. One thing to note is that in Google Analytics, one account can have multiple websites. After providing the account name, scroll down and click Next.
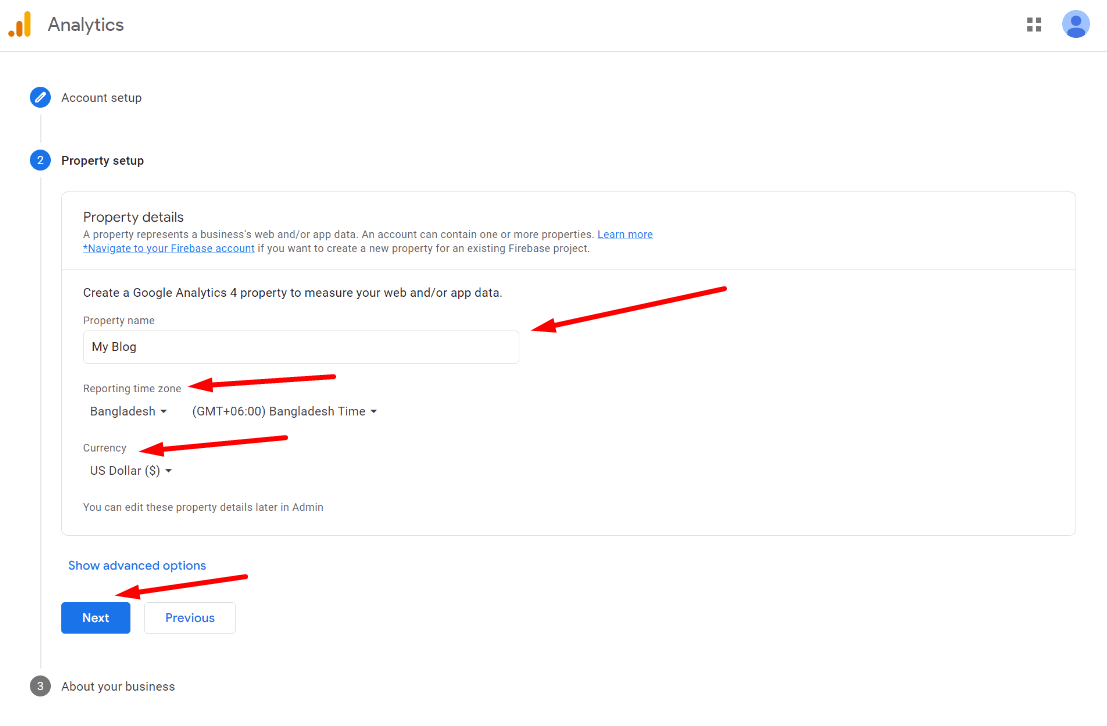
Next, in the ‘Property setup’ option, set your Business name as the Property name. Besides, set the Reporting time zone as per your country and set the Currency. After doing all these, click on Next.
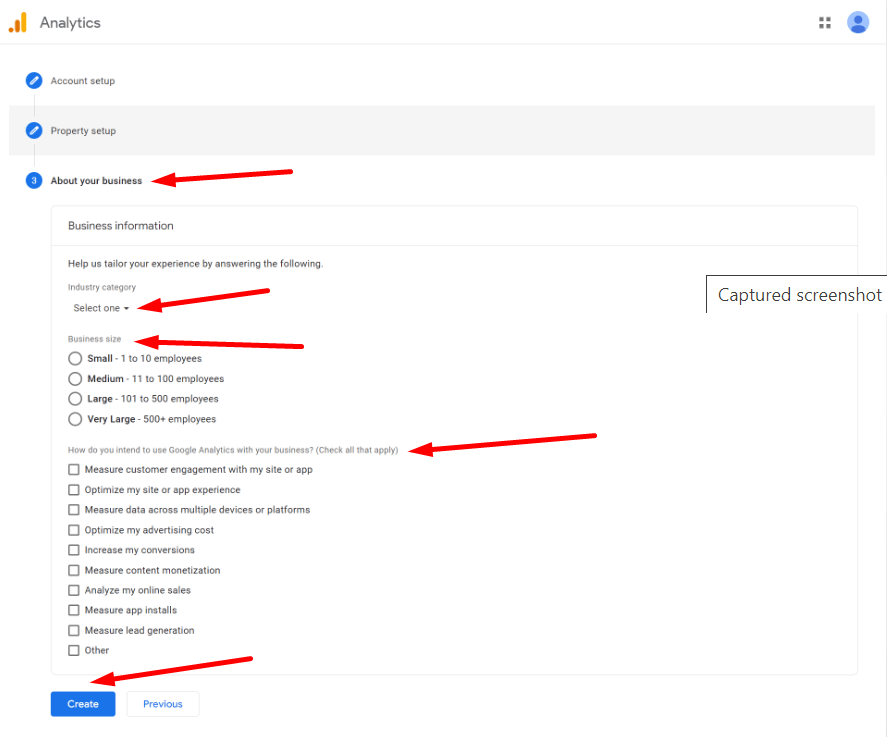
Next, in the ‘About your business’ section, provide some basic information about your business. Select the type of your business in the Industry category. Mention the size of your business in the Business size option.
Tick the reasons for using Google Analytics for your business in the ‘How do you intend to use Google Analytics with your business?‘. Lastly, click on Create.
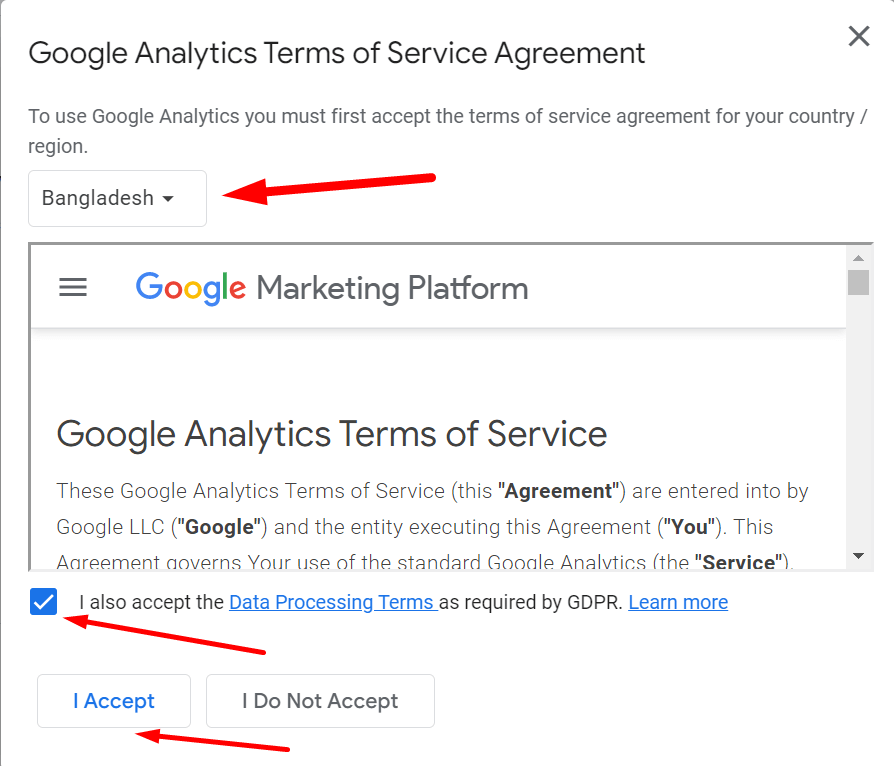
Navigate to country and region and Select your country from here. After that, if you like, you can read Google Analytics Terms of Service, and if you agree, then tick the Box. Lastly, click on I Accept.
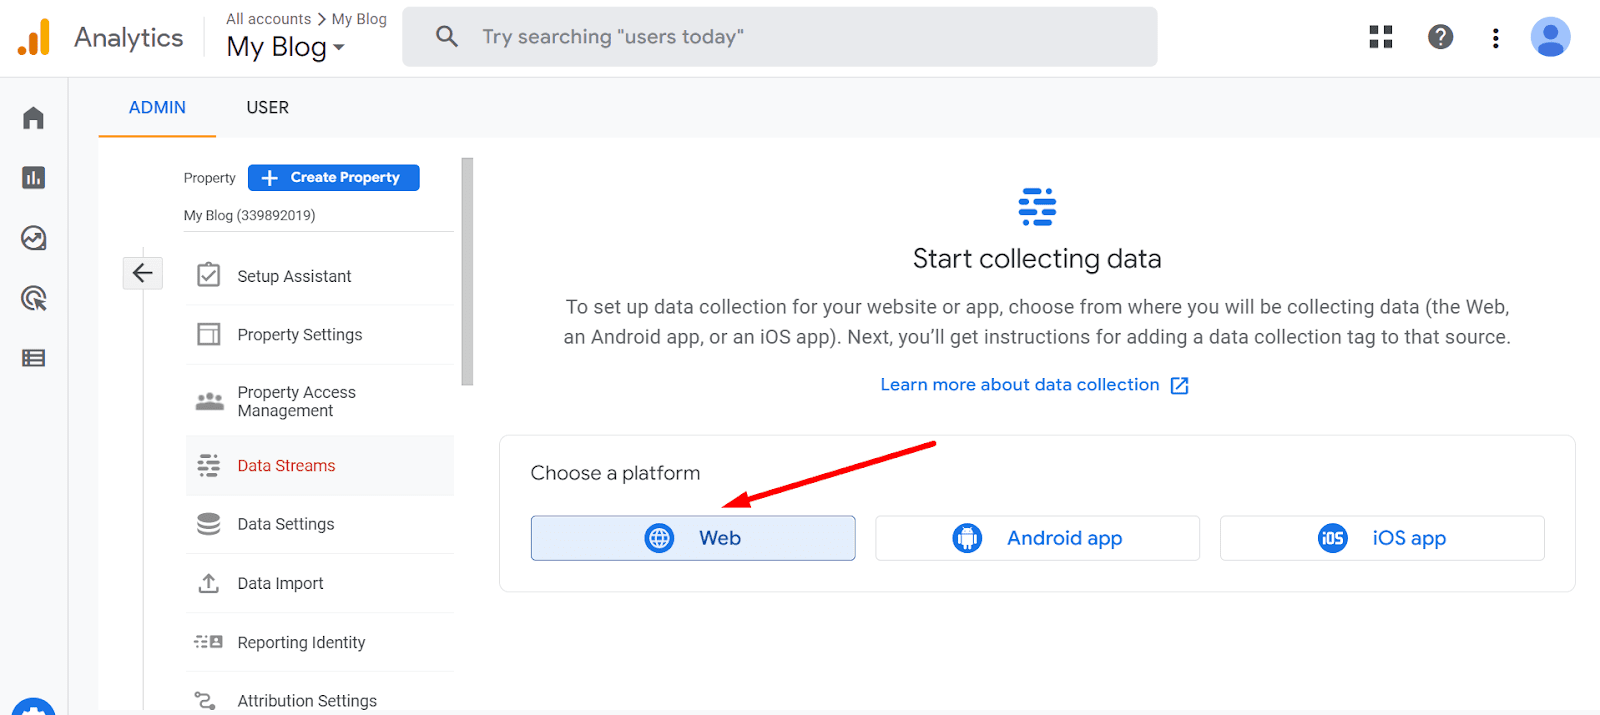
Step 4: Create a data stream
Next, it’s time to create a data stream with Google Analytics. So for this, come down and choose a platform. Here, we have selected Web because we want to connect Google Analytics with our website.
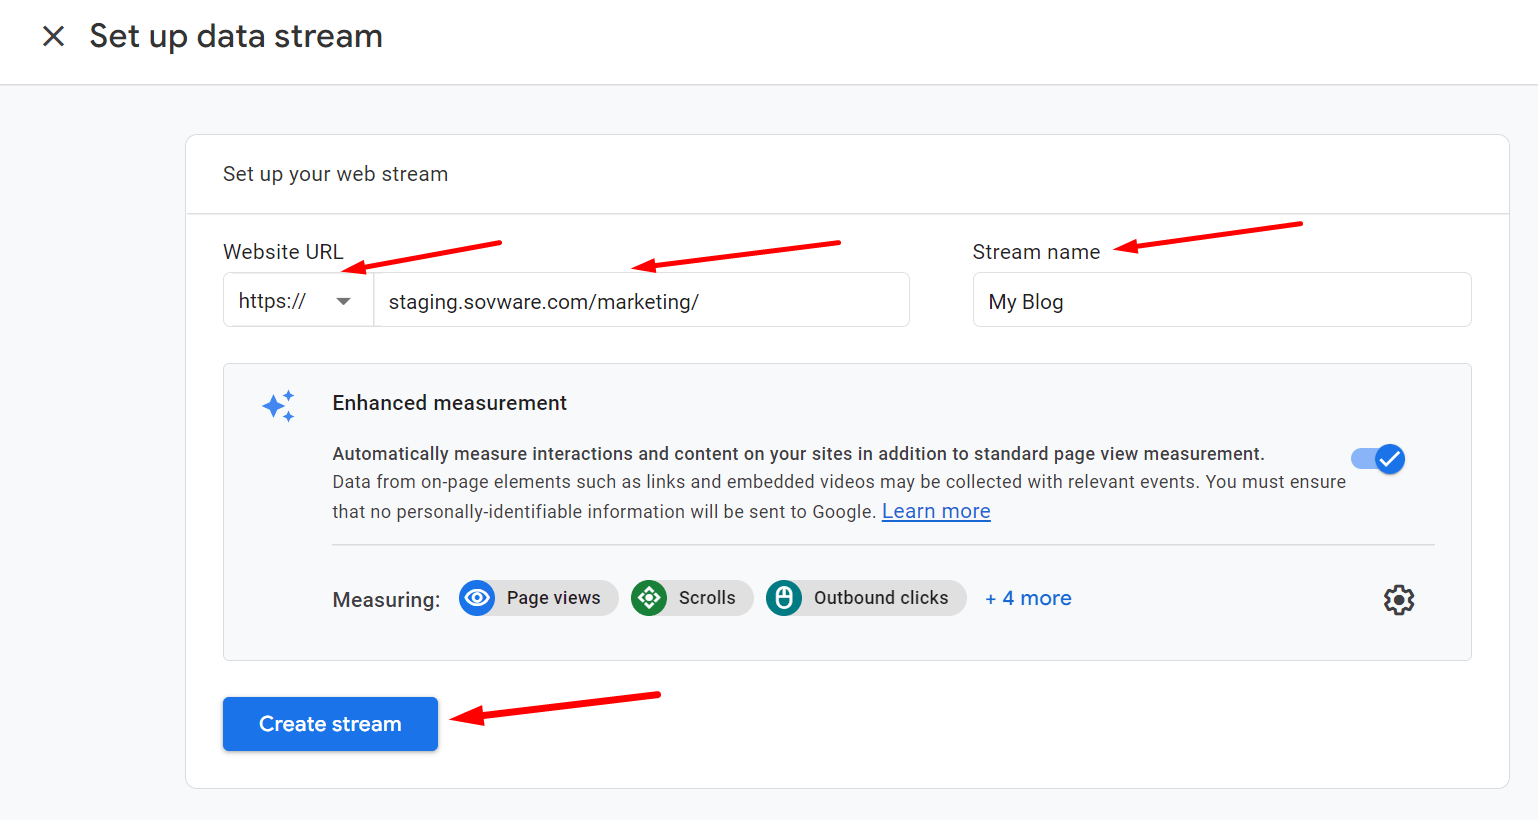
Navigate to the Website URL. Select https:// because it keeps your website secure. Now, give your website URL in the next Box. Give your business name as the Stream name. Lastly, click on Create stream.
Step 5: Copy and paste GA Tracking ID
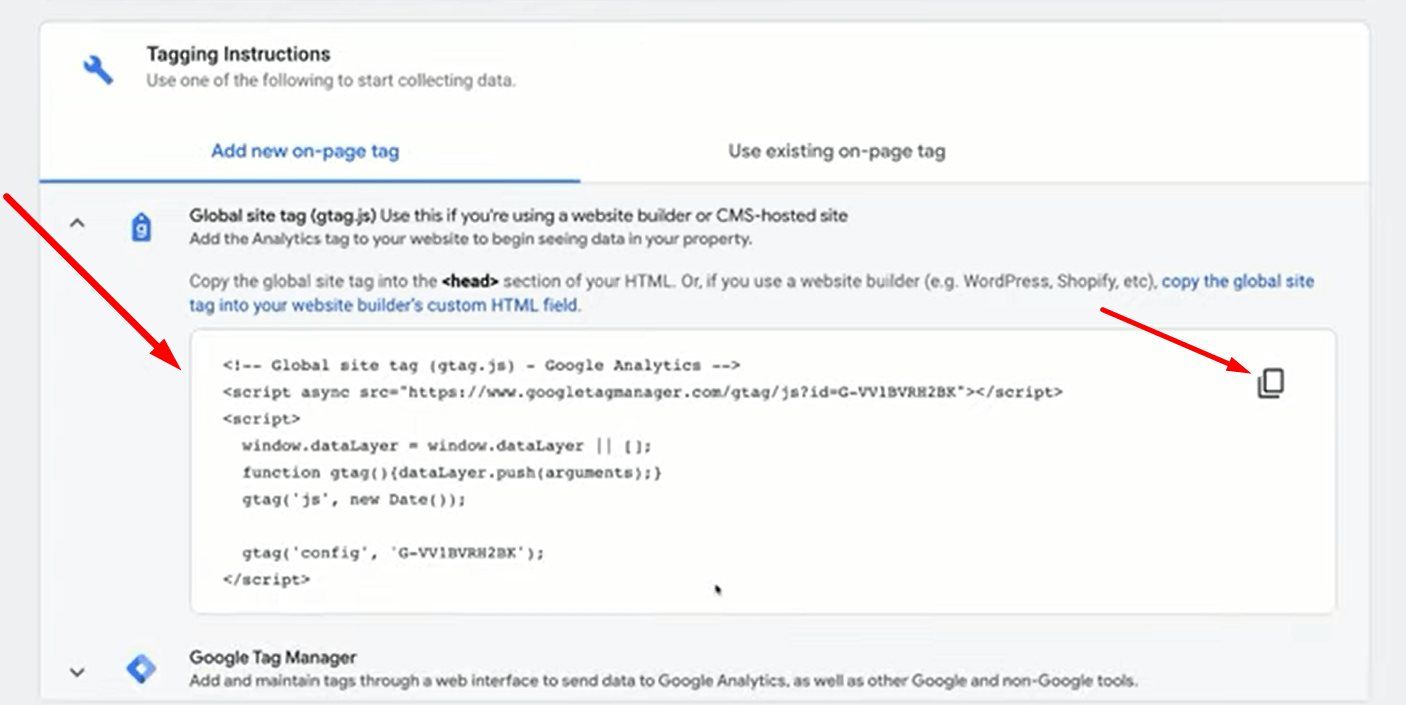
Up next, on the Web stream details page, navigate to MEASUREMENT ID and click copy.

Now, go to your website Settings ➤ Google Analytics ➤ Plugin Settings and paste the code we copied earlier in GA Tracking ID.
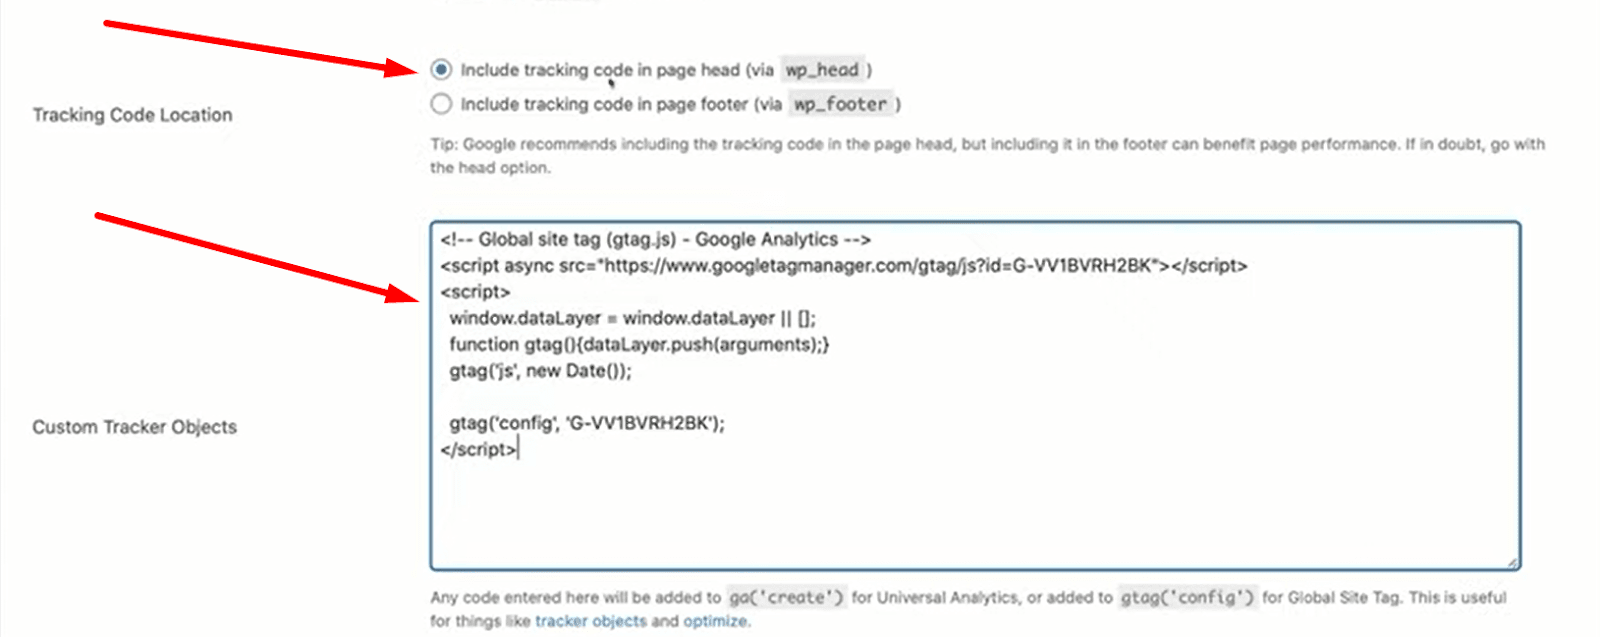
Move on to Google Analytics and the Global site tag option. Now copy the Global Site Tag Code by clicking the Copy icon.
Again return to your website’s Plugin Settings and paste the code into Custom Tracker Object. Besides, remember to select Include tracking code in page head. Once you have edited the information, then come down and click on Save Changes.
Finally, you have successfully installed Google Analytics on your website.
Wrapping Up
End of story! Using Google Analytics is a great way to get an overall idea about your visitor in a statistical format which will immensely help you improve the performance of your website in the future.
Throughout this tutorial, we’ve shown you how to install Google Analytics in WordPress website. If you have queries about today’s topic, leave your thoughts in the comment section.
If you liked this post, don’t forget to subscribe to our blog so that we can notify you once any post is published. Finally, you can also follow wpWax on Facebook, Twitter, and LinkedIn for more exciting news, offers, and product updates.

Abdullah Al - Harun
Abdullah Al Harun is a technical content writer at wpWax and a digital marketing enthusiast. Apart from tech, he enjoys reading books on different aspects of communication, journalism, science, and arts. On his time off, you will find him playing cricket with his teammates.


Leave a Reply
You must be logged in to post a comment.