

How to Take WordPress Backups Efficiently: A Comprehensive Guide
What if your WordPress website faces a catastrophe like security threats, hardware failure or you accidentally lock yourself out of the website? Will you sit motionlessly and repent for the loss you have faced?
The answer should be ‘No’ as WordPress backups are available to secure a website against any disastrous situation. However, ensuring backups for WordPress not only secures your website’s data but also helps visitors enjoy a seamless experience of exploring your website’s content.
Understanding the importance of security backups, WordPress offers different types of plugins that are reliable enough to secure a website. Therefore, this guide will demonstrate a detailed process for taking backups for WordPress using a powerful plugin.
Let’s dive deep into the discussion!
Why Regular Backups are Important for WordPress Website

Regular backups are essential to keeping your WordPress site safe and secure. Here are five key reasons why they matter.
i. Protection against data loss
Websites can face data loss due to server crashes, hacking attempts, or accidental deletions. Regular backups ensure that you always have a copy of your website’s data, allowing you to restore it quickly and minimize downtime.
ii. Guard against hacking
Even with strong security measures, websites can be vulnerable to cyberattacks. If your website is compromised, a backup can help you quickly recover and restore your site to its original state without losing important information.
iii. Easy recovery from updates gone wrong
WordPress plugin installations, updates or theme changes can sometimes break your site. Regular backups make it easier to revert to a previous, stable version if an update causes problems, saving time and stress.
iv. Quick restoration after server issues
Hosting providers may experience downtime or server failures that can impact your website. Having backups in place ensures that you can restore your website on a new server or host if needed, keeping your site operational.
v. Saves time and effort
Without regular backups, rebuilding a lost or broken website can be time-consuming and expensive. Backups let you restore your site in a few clicks, saving you the hassle of starting from scratch or recovering lost data manually.
How to Take WordPress Backups
Your WordPress website won’t be at risk anymore if you set proper backups for it. Likewise, this tutorial will guide you through a detailed process of WordPress backups using one of the most popular WordPress backup plugins called ‘All in One WP Migration.’
Step 1: Install and activate the plugin
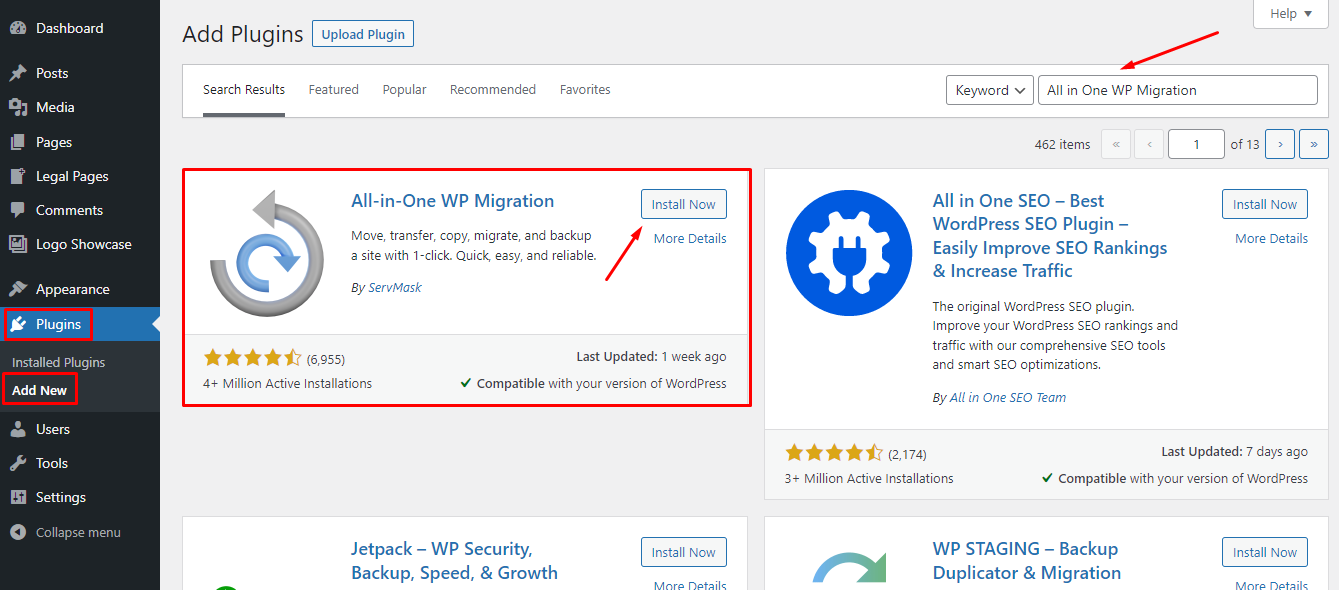
To install the plugin. Move onto your WordPress Admin Dashboard menu bar and click on Plugins ➤ Add New. By doing so, you will land on the WordPress Plugin repository.
Next, write ‘All in One WP Migration’ in the Search Plugins box. The plugin will be displayed simultaneously. Now, click on Install Now to install the plugin on your website.
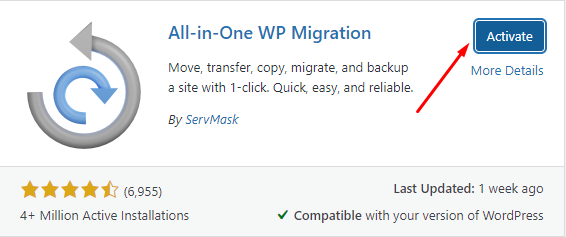
Up next, to make the plugin functional, click on Activate
Step 2: Backup WordPress site with the plugin
You have successfully installed and activated ‘All in One WP Migration’ on your WordPress site. To back up your website with this plugin, you should follow some specific steps.
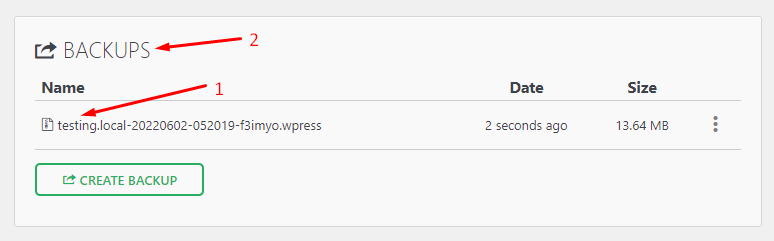
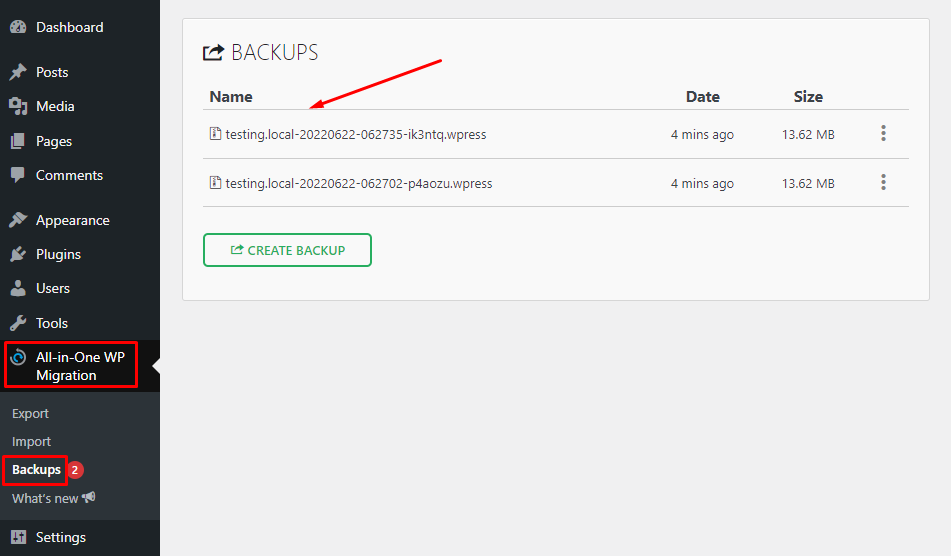
Navigate onto the Dashboard Admin Menu Bar and click on All in One WP Migration➤ Backups
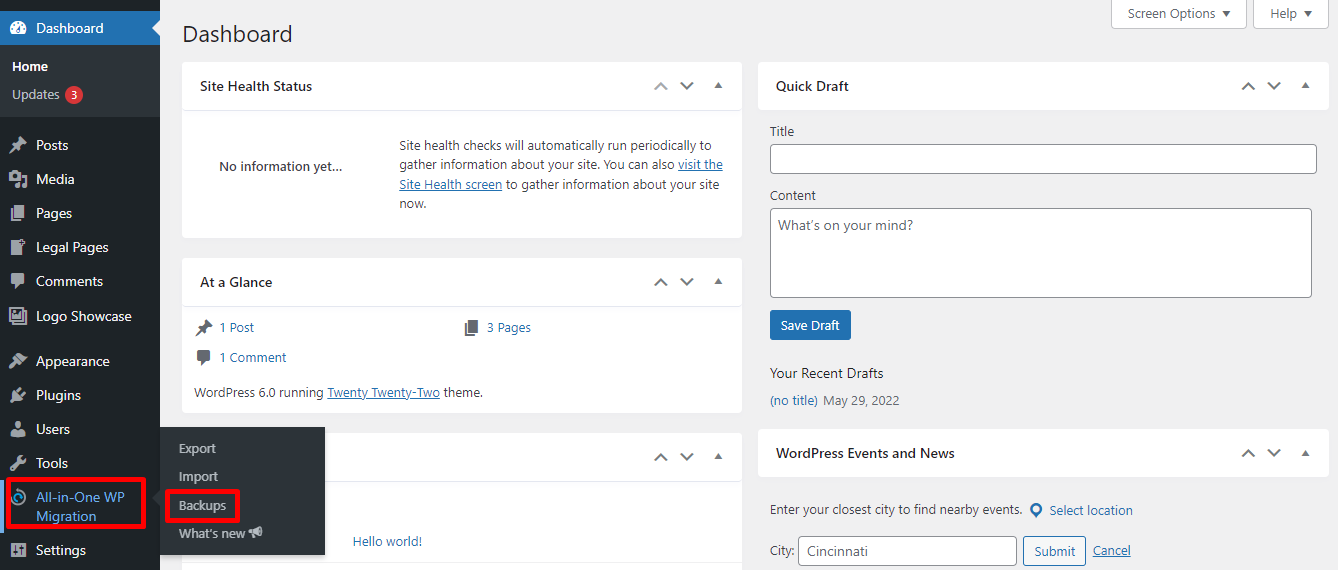
Next, you will be redirected to the Backups page. Click on Create Backup.
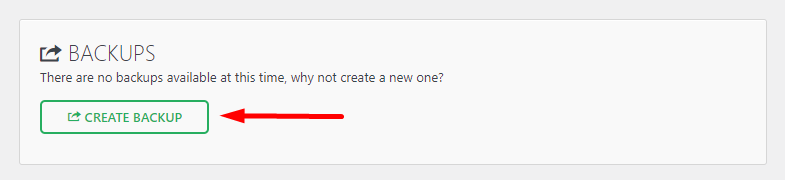
Once you have successfully created the Backup File, it will appear on the Backups page.
Step 3: Download the backup file
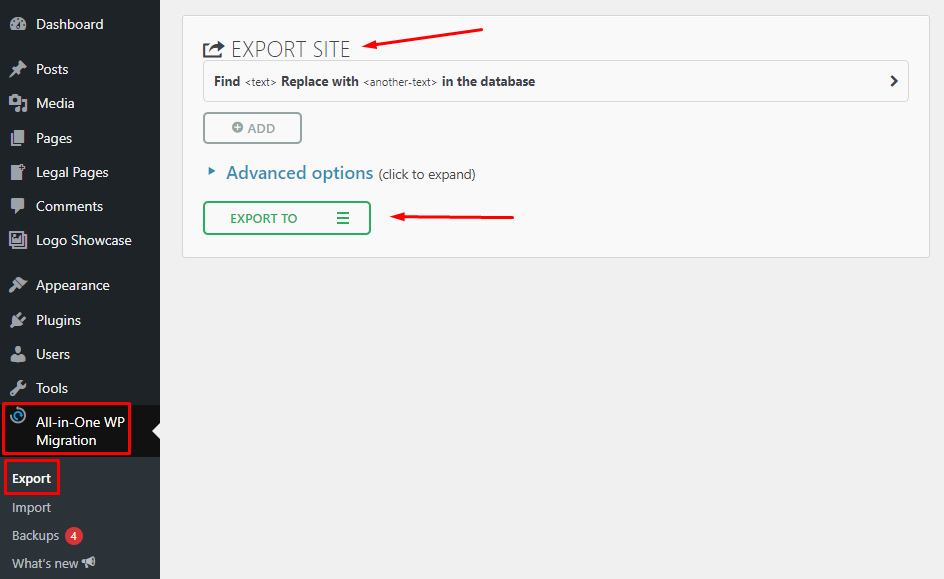
After successfully creating the backup file, you can download and save it on your local computer for safety purposes in an easy way. To do this, go to the Admin Menu Bar and click on All in One WP Migration ➤ Export. This action will take you to the EXPORT SITE page. Next, click on EXPORT TO.
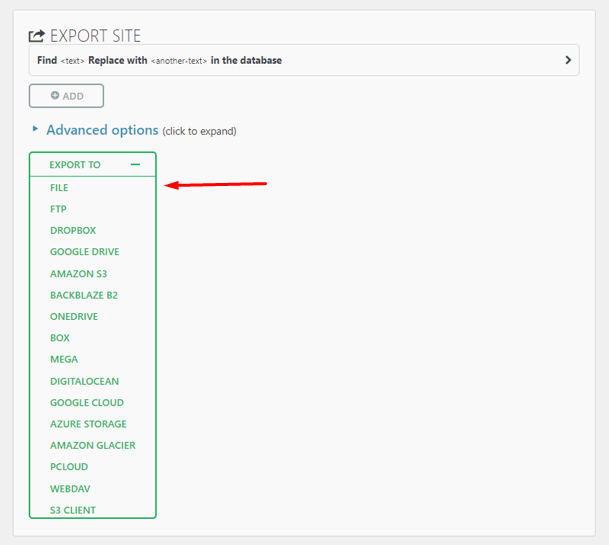
A drop down menu will appear instantly. From there, click on FILE. An automatic WordPress backup file will be created.
Now, click on the file named TESTING.LOCAL, and it will be downloaded on your local computer. Lastly, click on CLOSE to complete the download process.

Step 4: Restore the WordPress
Before restoring the WordPress website, ensure you have saved a backup file of the website that you want to restore on your local computer.
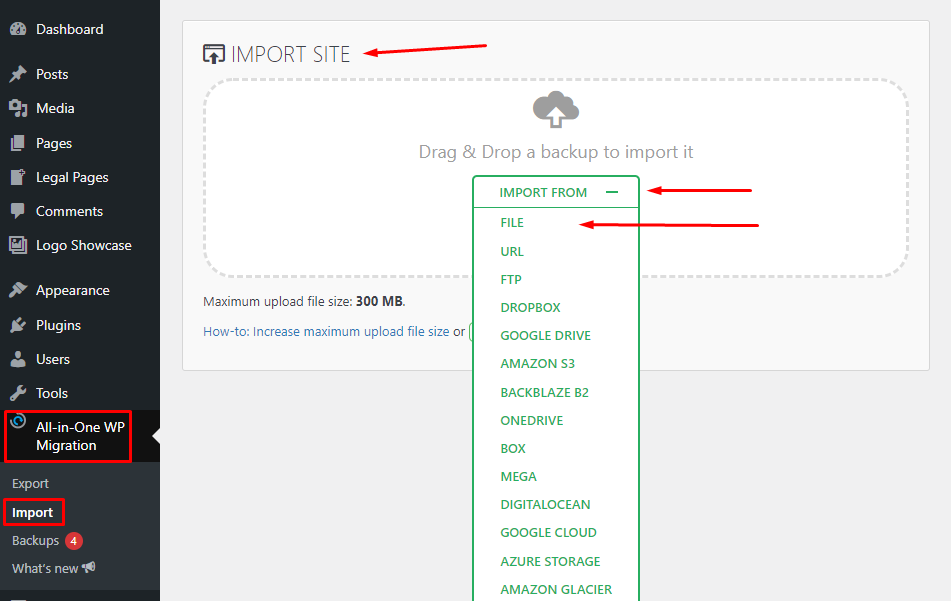
Go to the Dashboard and click on All-in-One WP Migration ➤ Import. You will move to the IMPORT SITE page. Now click on IMPORT FROM. A drop-down menu will appear, and click on FILE in it. Remember to locate and open the file you want to restore; the file should end with the “.wpress” extension.
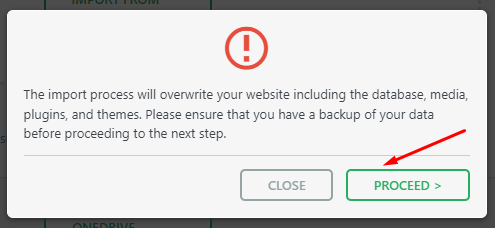
A popup will appear stating, “The import process will overwrite your website, including the database, media, plugins, and themes. Please ensure that you have a backup of your data before proceeding to the next step.” click PROCEED to continue.
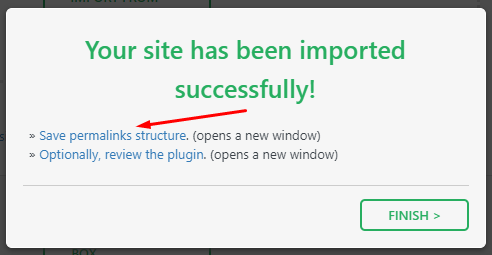
Your backup will start restoring your WordPress site. When finished, it will notify you with a message, “Your site has been imported successfully.” All-in-One WP Migration recommends saving the Permalinks structure. Click Save permalinks settings.
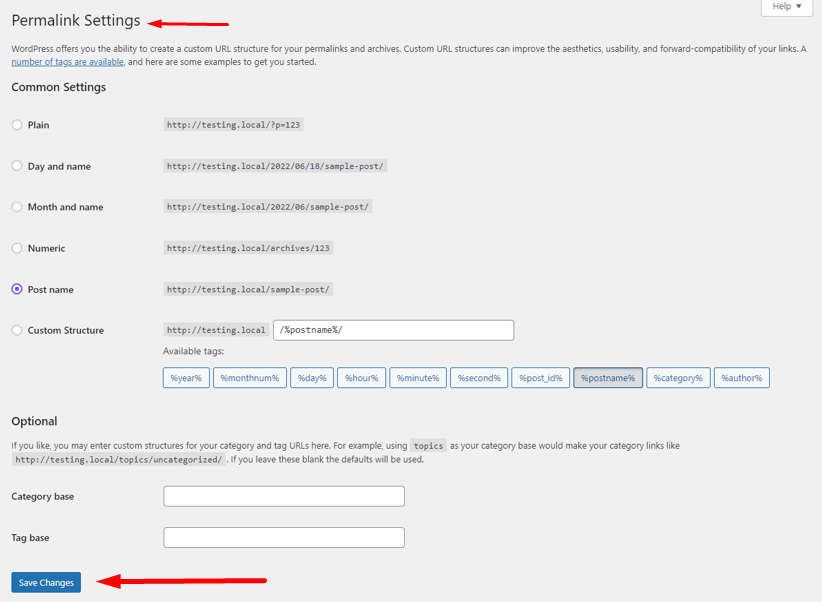
You will be redirected to the Permalink Settings page. Click on Save Changes on the footer of the page.
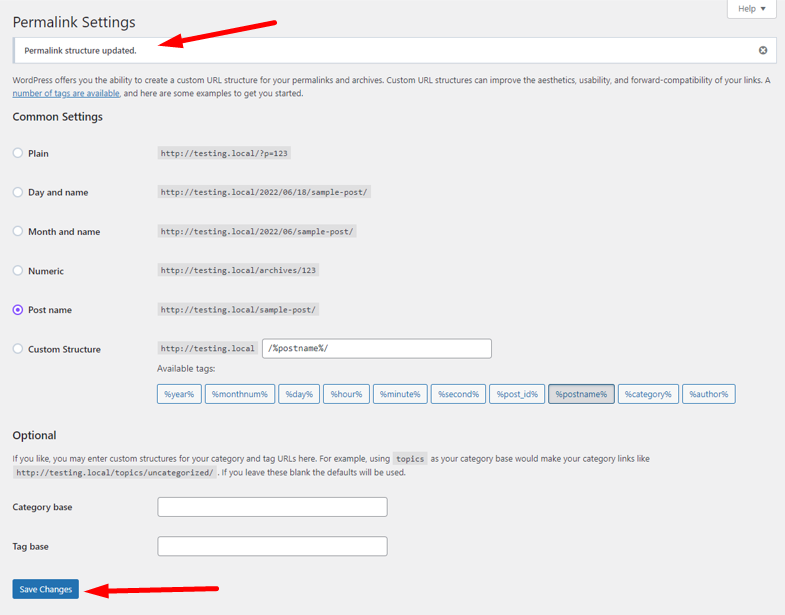
A message Permalink structure updated will appear. Click on Save Changes again. Your website will be successfully restored and functional.
Step 5: Delete a WordPress Backup
It’s a good practice to delete WordPress backups to save your website’s valuable spaces. This process helps significantly to keep your website in a healthy condition. To do this, head towards your Dashboard Admin Menu panel and click on All in One WP Migration ➤ Backups. You will see a list of Backups there.
Now, it’s time to select which backup file you want to delete. For this, click on the three dots at the right side of the Backup file you want to delete. Here, you have selected the first Backup file of the list and click on the three dots here.
A drop-down menu will appear and just click on the X Delete.
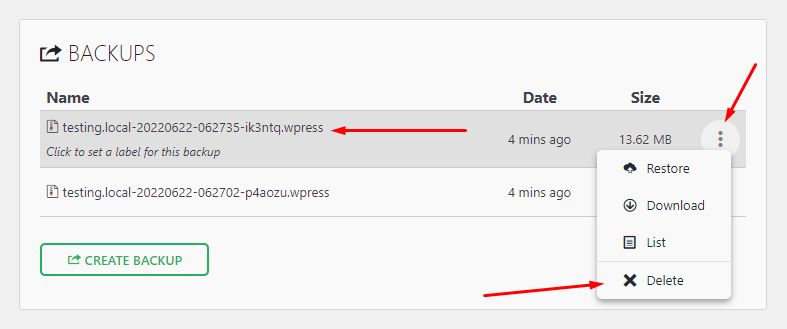
Next, a popup menu will appear and ask you “Are you sure you want to delete this file?” Click on OK to delete the file from the web server.

Best Practices for Taking WordPress Backups Efficiently

Following best practices for WordPress backups helps ensure your site is secure and your data is safe. You can consider these five key points:
i. Schedule automatic backups
Set up automatic backups to avoid missing important data. Scheduling daily or weekly backups depending on your website’s activity ensures that your site’s data is consistently saved without needing manual intervention.
ii. Use a reliable backup plugin
Choose a reputable WordPress backup plugin that fits your needs. Plugins like UpdraftPlus or BackupBuddy allow you to schedule backups and store them securely. Always ensure the plugin is updated and supports the latest version of WordPress.
iii. Store backups in multiple locations
Never store your backups only on your web server. Save copies of your backups in multiple places, such as cloud storage (Google Drive, Dropbox) and external hard drives, to ensure you have access in case of server failures or hacks.
iv. Keep several backup versions
Maintain multiple versions of your backups to have options in case you need to restore a site from an earlier date. Keeping at least three to five backup versions allows for flexibility in case recent backups contain errors or problems.
v. Test your backups regularly
It’s important to test your backups to ensure they work properly. Periodically restoring your site in a staging environment will help confirm that your backups are functioning as expected, giving you confidence they will work when needed.
Common Backup Mistakes to Avoid for WordPress Website

When backing up your WordPress site, it’s easy to make mistakes that could cause trouble later. These are five common backup mistakes you should avoid.
1. Not scheduling regular backups
One major mistake is relying on manual backups instead of scheduling them automatically. Missing even one backup can result in losing important data. Automating backups ensures your site is always protected.
2. Storing backups on the same server
Many users store backups on their website’s server, but this puts backups at risk. If your server crashes or is hacked, you’ll lose both your site and the backup. Always store backups offsite, like in cloud storage.
3. Not testing your backups
It’s a common mistake to assume that a backup works without testing it. If you need to restore your site and the backup is faulty, you’ll face problems. Always test your backups to ensure they can be restored successfully.
4. Keeping only one backup version
Relying on a single backup version is risky, especially if it contains errors or issues. Keep multiple versions of your backups to have a fallback option in case you need to restore from an earlier version.
5. Forgetting to backup all files
Some users only back up the database and forget other important files like plugins, themes, and media files. Ensure that your backup includes the entire website, so nothing important is left out during restoration.
Closing Out
As a savvy website owner, it’s always a wise decision to take precautionary steps whether your WordPress website faces a catastrophic situation or not. Arranging a solid backup for WordPress will give you relief to run your website without tension on what to do if any disaster occurs. Besides, managing powerful WordPress backups helps you run your website tension freely as all the data is safely secured.
In today’s article, we have guided you in the best way possible on effortlessly taking backups for your WordPress site with a zestful plugin. In that case, we think you will be able to learn quickly about the backup process.
If you liked this post, don’t forget to subscribe to our blog so that we can notify you once any post is published. Finally, you can also follow wpWax on Facebook, Twitter, Instagram and LinkedIn for more exciting news, offers, and product updates.

Abdullah Al - Harun
Abdullah Al Harun is a technical content writer at wpWax and a digital marketing enthusiast. Apart from tech, he enjoys reading books on different aspects of communication, journalism, science, and arts. On his time off, you will find him playing cricket with his teammates.


Leave a Reply
You must be logged in to post a comment.